Mocha Toffee Crunch Vegan Ice Cream

Mocha Toffee IceCream-2

Happy summer! It’s past Solstice now, and alternates here between pouring rain and hot hot sunshine. Which is OK – Edmonton in the summertime is pretty nice. I must be adapting to the heat this year, as only a few times so far have I felt like I would melt if I didn’t watermelon or a popsicle or ice cream into me ASAP.

Mocha Toffee IceCream-3

If you only and up making ice cream rarely this summer, this flavour is definitely a good choice: cool chocolate perked up by a touch of coffee flavour, contrasting with bits of crunchy toffee.

Mocha Toffee IceCream-4

I’ve included a toffee recipe that results in a candy that may seem rather oily, as that acts as the candy’s “raincoat” and prevents it from softening or getting soggy when mixed in to the ice cream. It’s a nice mix of contrasts and a lovely treat on a hot (or cold!) day.

Mocha Toffee IceCream-1

Mocha Toffee Crunch Vegan Ice Cream

By Agent Minty.

Ingredients: 

Ice cream base:

  • 1/4 cup corn starch
  • 1/3 cup brown sugar
  • 1/4 cup cocoa
  • 1c white sugar
  • pinch of salt
  • 1 3/4 cups almond milk
  • 1 Tbsp instant coffee powder
  • 2 cups canned coconut milk

Toffee Bits:

  • 1/3 cup blanched, slivered almonds
  • 3 Tbsp Earth Balance or other hard margarine
  • 2 tsp coconut oil
  • 2/3 cup white sugar
  • 1/4 tsp salt
  • 1 Tbsp golden syrup
  • 1.5 tsp water

Instructions:

  1. Whisk together corn starch, brown sugar, cocoa, 1 cup white sugar, salt, and 2/3 cup of the almond milk in a large saucepan. Heat on medium.
  2. Mix the instant coffee with about 3 Tbs of the remaining almond milk. Add to mixture in saucepan.
  3. Keep stirring mixture until sugar is dissolved and it starts to simmer. Turn down heat to medium-low.
  4. Keep stirring while slowly adding remaining almond milk, then coconut milk.
  5. Cook mixture until slightly thickened and glossy, about 5 minutes.
  6. Remove from heat, and cover surface with plastic wrap to prevent a skin from forming. after cooled slightly, refrigerate for at least three hours.
  7. Toast almonds in a ~350F oven for 2-5 minutes, until lightly golden, then remove to cool, and chop finely.
  8. Melt Earth Balance and oil in a small saucepan, then add sugar, syrup, water, and salt.
  9. Prepare a cookie sheet by lining with aluminum foil and tossing chopped almonds onto an area approximately 12×12 inches.
  10. Stir syrup on medium heat until sugar starts to dissolve, then add a candy thermometer and cook, undisturbed, until the syrup reaches Hard Crack stage (300-309 Fahrenheit).
  11.  Give candy one quick stir with a spatula, then pour over the almonds on the cookie sheet. Use the spatula to sweep any extra almonds onto the toffee area. You will get a thin puddle of candy smaller than the cookie sheet itself.
  12. Allow the toffee to cool for at least one hour before breaking into slivers.
  13. Freeze ice cream base according to instructions for your ice cream machine. Add in toffee bits for the last minute of mixing.
  14. Transfer to a plastic container and freeze overnight before serving.

Vegan homemade donuts!

Donuts-9

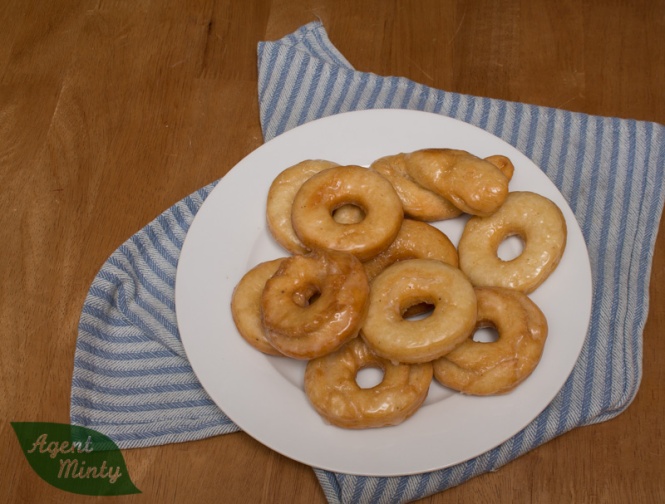
It’s national donut day and if you have the time tonight, celebrate by making donuts! These tasty guys are my favourite kind – old-fashioned cake donuts with a generous pinch of nutmeg, and a nice vanilla glaze.

Donuts-12

These are a vegan version of what Tim Horton’s “sour cream” donut could be if they really tried to elevate their donuts.

Donuts-16

Donuts-13

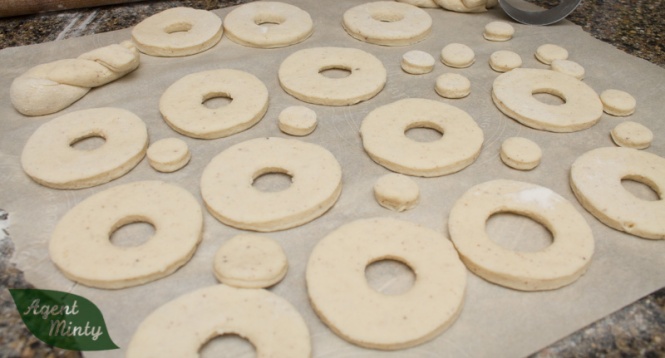
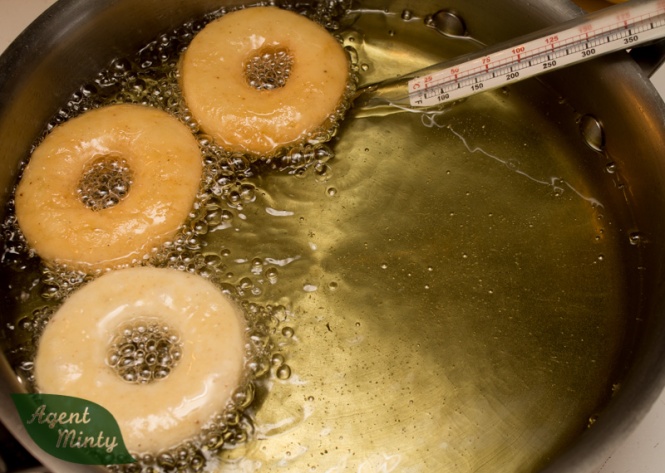
They do need to be fried in oil to get that crinkly, tasty texture, but even so they are a simple recipe to make. Blend, whisk, mix, rest, roll, cut, fry, glaze. Eat, eat, eat.

Donuts-15

Donuts-14

Donuts-11

You will obviously get a bunch of donut holes, too, but we ate all the ones I made before I took the pictures. Oops!

Donuts-10

Vegan Old-Fashioned “Sour Cream” Donuts

By Agent Minty, heavily adapted the recipe posted at The Messy Baker. Makes approximately 16 donuts plus holes.

Ingredients: 

  • 3/4 cup (90g) all-purpose flour
  • 1 1/2 cups (180g) pastry or cake flour
  • 1 1/2 tsp baking powder
  • 1/4 tsp baking soda
  • 3/4 tsp nutmeg
  • 1 tsp salt
  • 3/4 block medium tofu
  • 2 tsp apple cider vinegar
  • 1 Tbsp corn starch
  • 1 Tbsp dairy-free “milk” of choice
  • 2 Tbsp (30g) shortening
  • 1/2 cup granulated sugar
  • 1 1/4 + 2Tbsp icing sugar
  • 3 Tbsp warm water
  • 2 tsp corn syrup
  • 1/4 tsp vanilla
  • at least 3 cups of Canola or other neutral-flavoured oil for frying

Instructions:

  1. Whisk together flours, baking powder, baking soda, nutmeg, and salt. Set aside.
  2. In a food processor or blender, puree tofu until completely smooth.
  3. Remove 3/4 cup +  4 tsp (200g) of the tofu puree and combine with vinegar, corn starch, and milk. Set aside (unused extra tofu can be discarded or used in a smoothie).
  4. Cream together shortening and granulated sugar until fluffy, about 1 minute in a stand mixer.
  5. Alternate repeatedly adding 1/3 of flour, then 1/2 of milk, beating mixture between additions. The dough will be sticky afterwards and a bit lumpy.
  6. Transfer to a clean bowl and cover with plastic wrap. Refrigerate for 40 minutes or longer.
  7. Fill a heavy, deep pan at least 2inches deep with oil. Heat on med-high until a candy thermometer in the oil indicates that the oil is 325°F/165°C.
  8. While the oil is heating, roll out the dough on a well-floured surface until it is 1/2-inch thick. Cut into rounds about 2 or 3 inches across, with a hole in the centre (I used the lid from my bottle of vanilla extract). Scraps can be gently pouched together and rolled out again to cut out more donuts. You’ll see I also tried making the donut shape mentioned in Laura Wilder’s Farmer Boy, the passage mentioning it can be read here.
  9. Whisk the water into the icing sugar, mix in the vanilla and corn syrup, and set aside in a bowl near where your donuts will cool. Ensure that you have a wire rack set up with paper towels or a tray underneath, for cooling the donuts and that the oil is still the correct temperature.
  10. Brush extra flour off the donuts before frying – this will reduce splattering!
  11. Place 2-4 donuts at a time into the hot oil, allowing them to cook for 10-15 seconds on the first side, flipping them, cooking for another 1-2 minutes until golden brown on that seconds side, then flipping again (so the first side gets fully cooked).
  12. Remove donuts from oil and place more in one donut at a time. While second batch is cooking, dip the first batch in the vanilla glaze and set donuts to drip and cool on the wire rack.


Happy Easter! Chocolate Egg Inspiration!

ChocEggs-7

I guess that it’s been a rather long hiatus. Excuses, excuses abound, but you’re not here to read those. You’re here to see the goods! And in today’s case, they are totally worth it: vegan easter eggs filled with marshmallow or peanut butter fillings, or solid fruit-and-nut eggs.

ChocEggs-1

The first Easter after I went vegan was hard, because (as I think I mentioned before) I love seasonal candy. Take cheap jelly beans, make them egg shaped and speckled, and I’m sold. I loved Reese’s eggs and those malted-milk Robin Eggs, too. I’m still working on a malt ball substitute, but the eggs I present to you today are a huge hit with my family – I make several dozen to give away.

In order to make these, I had to use a mould, which I bought from Bulk Barn several years ago. As I wrap the completed chocolates in foil and store them in the refrigerator, I didn’t brother to temper the chocolate after melting it. I just used vegan semisweet chocolate chips and melted them in the microwave.

ChocEggs-12

The recipes below fall more into the “unrecipe” category, as the amounts are suggestions; the number of eggs will depend on the size and shape of moulds you use. Mine were the same general shape as a chicken’s egg (but halved).

ChocEggs-5

Finally, the marshmallow recipe that I used produces far more than the filling required for one dozen eggs (I moulded six chocolate shells, popped them out and moulded six more to fill all at the same time). I  experimented with making a vein version of Peeps, those chick shaped, sugar coated marshmallows. They are in some of my photos above, but they look more like chick-elephant hybrids. The rest of the marshmallows I made into traditional cylindrical mallows. To get the pastel fine sugar, I just pureed coloured sanding sugar in a spice grinder until it was a coarse powder.

ChocEggs-6

Ok, so here goes:

Chocolate Easter Eggs

A collection of original recipes by Agent Minty

Marshmallow Eggs (Vegan version of Russell Stover Eggs)

Makes 12 or more eggs, plus extra marshmallow filling

Ingredients:

Instructions:

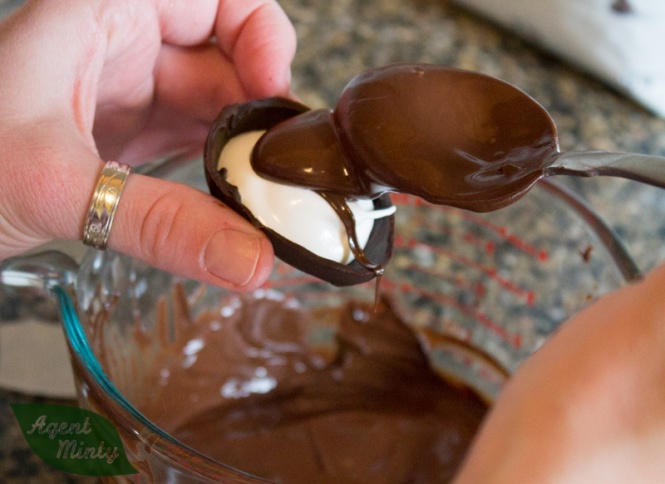
  1. Melt chocolate in microwave and use 1-2 tsp per cavity to line walls.Freeze for 5 minutes.
    ChocEggs-9
  2. Check to see if chocolate is thick enough. If you can see light through, add another thin later and chill for another 5 minutes or more.
  3. Prepare marshmallow filling according to recipe and transfer 2 cups to a large piping bag with no tip.
  4. Dollop about 2 Tbsp of rolling per moulded egg.
    ChocEggs-10
  5. Using a damp fingertip, smooth top of marshmallow down to better fill egg mould.
  6. Chill for at least 10 minutes.
  7. Re-melt chocolate and smooth chocolate over marshmallows, paying special attention to edges of the first half shell.
  8. Chill for at least 20 minutes before removing from mould and wrapping with foil.
  9. Optional: Pipe out remaining marshmallow mix onto sheets of parchment paper coated with fine sugar. Toss with more sugar. If cutting long tubes into short marshmallows, let cure for at least 30 minutes before cutting with scissors. Cure, uncovered, overnight for best texture.

ChocEggs-11

Peanut Butter Eggs (Vegan version of Reese Eggs)

Makes 20 or more eggs. Scale as needed.

Ingredients:

  • 2 1/2-3 cups dark chocolate chips
  • 1 cup peanut butter
  • 3/4 cups + 1 Tbsp icing sugar
  • 3/8 tsp salt (if the peanut butter you use has salt, cut to 1/8 tsp)
  • 2 Tbsp packed brown sugar

Instructions:

  1. Melt chocolate in microwave and use 1-2 tsp per cavity to line walls.Freeze for 5 minutes. Coat a second time if needed.
  2. Mix together remaining ingredients until a smooth paste forms.
  3. Press 2-3 tsp of filling into each cavity and top with more melted chocolate.
  4. Store excess peanut butter filling in fridge between uses.
  5. Chill for at least 20 minutes before removing from mould and wrapping with foil.
  6. Repeat steps 1 and 3 to make more eggs as desired.


Fruit and Nut Eggs (Vegan version of Cadbury Fruit&Nut Bar)

Makes 8 or more eggs. Scale as needed.

Ingredients:

  • 1 1/2 cups dark chocolate chips
  • 6 Tbsp blanched, slivered almonds
  • 1/4 – 5Tbsp raisins

Instructions:

  1. Toast slivered almonds for about five minutes until light brown.
  2. Coarsely chop raisins and toasted almonds.
    ChocEggs-13
  3. Melt chocolate and stir in chopped raisins and almonds.
  4. Fill moulds. Tap on a counter to remove air bubbles.
  5. Chill at least 30 minutes before removing from mould and wrapping with foil.
  6. Re-warm chocolate mixture briefly if needed to fill more moulds.


ChocEggs-8

Happy Easter!

Six Years

WordPress notified me that it’s  my 6th blogaversary.

My very first post was a documentation of my experiments with vegan whipped cream, and I’ve kept up the experiments, improved my photos a bit, and have gone 100% vegan. In my life, I went back to grad school several years ago, but am not done yet. A big kitchen reno, several broken plates, and dozens of bags of flour, and here we are.

Thanks, everyone, for your support and readership over the years.

Easy peaches-n-cream scones

PnC scone-1

So, it’s full-on holiday season for a lot of people around here. Many parties and so on. We had an fun party this weekend where a lot of sweet friends came over and became even sweeter after being coated in royal icing and candy to decorate gingerbread houses.

I don’t know about you, but I can feel pretty tired the next day, even if I haven’t had much to drink (probably comes from no longer being in my 20s, too). A lazy post-party Sunday can call for a slightly rich breakfast with very little effort. That’s when you should make these scones.

Peaches and Cream Scones

An original recipe by Agent Minty

Makes 12 large scones

Ingredients:

  • 2 cups + 1 Tbsp  (250g) all-purpose flour
  • 2 Tbsp white sugar
  • 4 1/2 tsp baking powder
  • 1/2 tsp salt
  • 1/2 cup (about 130g) drained canned peach segments, roughly chopped
  • 1/2 cup almond milk
  • 6 Tbsp coconut cream from a can
  • 1/2 tsp almond extract
  • 1/4 tsp vanilla extract
  • 3 Tbsp (45g) cold Earth Balance or hard margarine
  • 3 Tbsp (45g) shortening
  • 2 tsp white sugar
  • 1 tsp cinnamon powder

Instructions:

  1. Preheat over to 450F and line a baking sheet with parchment paper.
  2. Whisk together flour, 2 Tbsp sugar, baking powder, and salt.
  3. In a separate bowl, combine peaches, milk, coconut cream, and extracts.
  4. Using a pastry cutter or two knives, cut fat into the dry ingredients until the crumbs are the size of peas.
  5. Pour wet ingredients in and fold/stir gently until everything is combined. Dough will be quite wet!
  6. Plop the dough on the cookie sheet approximately 1/3-cup at a time, with 2 inches between each mound. Divide any remaining dough equally between all 12 scones.
  7. Combine sugar and cinnamon and sprinkle over scones.
  8. Bake for 11-12 minutes, rotating sheet once.
  9. Transfer to a wire rack to cool.

Is it time to start posting holiday recipes?

Empirecookies-5

It’s November 26, a full 29 days before Christmas. Yet decorations have been up in stores for weeks, there has been a radio station playing Christmas music since the 15th, and some of my neighbours already have their lights up and turned on! Things usually start “too early” for most people, me being one of those people who likes to save Christmas stuff for December, please.

That said, I took a departure from reality and had a wonderful girls’ weekend at Jasper Park Lodge three weeks ago. My mom took my sister and I to their Christmas in November event. We spent four days sampling holiday drinks, learning festive recipes, making some crafts, and having a good time with the rest of the attendees. My mom and sister are big fans of Anna Olson, host of Sugar, cookbook writer, and all-around nice person. We enjoyed the presentation she gave with her husband Michael, although the recipes provided more inspiration than temptation – food from all the presenters was definitely not vegan-friendly, but I left with lots of ideas.

Empirecookies-4

Empirecookies-6

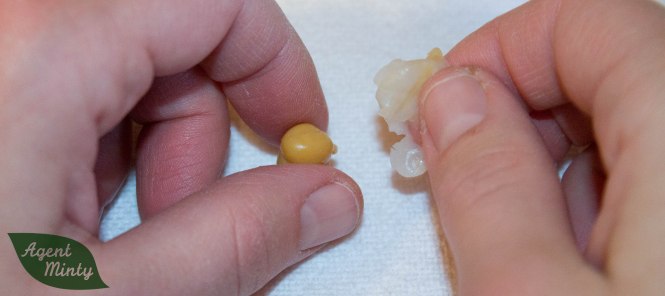
This is the first recipe from that event that I have veganized so far: Anna Olson’s Empire cookies. They’re based on a basic sablé shortbread recipe, which is crumbly when you bite into them but not as fragile as some North American shortbreads. She used a cooked egg yolk in the dough, to enrich it without adding moisture. Instead, I removed the skins from a few canned chickpeas and mashed them very finely. Works perfectly!

Empirecookies-1Empirecookies-2Empirecookies-3

Now, to the cookies themselves. I shared them first as they are a really great recipe to put out when you have holiday visitors. They’re pretty, and look like they took a lot of effort, but are actually easier to make attractive than something like a traditional cut and iced sugar cookie. I chose red strawberry jam and green candied cherries to make them look festive. They’re delicious to have with a mug of tea, or to wrap up and give as gifts to your neighbours. You know, the ones with the Christmas lights up already 😉

Empirecookies-7

Empire Cookies

Veganized from Anna Olson

Makes 2 dozen sandwich cookies

Ingredients:

  • 14 canned chickpeas (11 grams/1 heaping Tbsp)
  • 1/2 tsp psyllium husk powder
  • 5 tsp water
  • 1/2 tsp olive oil
  • 1/2 tsp vanilla extract
  • 1/2 cup + 2 Tbsp Earth Balance or other baking margarine
  • 1/2 cup + 2 Tbsp icing sugar
  • 1 3/4 cups pastry flour
  • 1/4 tsp salt
  • approximately 1/3 cup thick jam (cheap is good here-it won’t make things soggy)
  • 1 cup icing sugar
  • 1-2 tbsp water
  • 1//4 tsp almond extract
  • 8-12 candied/glacé cherries, cut into halves or smaller

Instructions:

  1. Pinch skin off chickpeas and discard. Mash very thoroughly on a plate with a fork until completely smooth.
  2. Combine psyllium husk powder with water and stir well. Add in olive oil, vanilla, and mashed chickpeas. Set aside.
  3. Cream margarine with icing sugar until smooth.
  4. Add “egg” mixture to the mixing bowl and stir until completely mixed in.
  5. Whisk or sift flour and salt together and add to mixer, and stir until well combined.
  6. Transfer dough to plastic wrap and chill for at least two hours.
  7. Preheat oven to 325F.
  8. Roll out dough to approximately 1/4-inch thick, and cut out 2-inch circles. Transfer to parchment-lined cookie sheets.
  9. Bake for 10-12 minutes, until lightly golden. Cool cookies directly on cookie sheets for at least one hour.
  10. Spread 1-2 tsp of jam on the bottom of half of the cookies, and top each with another cookie to make a sandwich.
  11. Stir together icing sugar, almond extract, and 1 Tbsp of water, adding a few drops more of water at a time until the glaze is smooth and slightly runny (think very runny pancake batter).
  12. Spread glaze on top of each cookie and top with a piece of cherry.
  13. Allow to dry for several hours before storing in a sealed container. Assembled cookies keep for about three days at room temperature.

Wonton Soup

WonTons-5

I have always loved wonton soup. Having spent a large portion of the 90s on military bases, which were quite culturally homogeneous, most of the “exotic” restaurants we had a chance to try were Chinese buffets. I loved them (in my pre-veg days), and was sad when I became vegetarian and couldn’t find meat-free wonton soup in restaurants.

WonTons-3

My parents had some in-depth cookbooks for people who wanted to learn Chinese cuisine, and as a teenager I experimented with making wontons filled with mashed tofu (instead of the recommended ground pork) and green onions. They were good but tended to leak tofu, and I made them occasionally in high school and university until I discovered a local buddhist vegan restaurant that makes divine wonton soup. Padmanadi is an awesome restaurant for anyone visiting Edmonton, veg or no. However, they are a 30+ minute drive away, and I wanted a recipe I could whip up at home.

WonTons-4

Trial and error resulted in a recipe that uses gluten flour in the filling for wontons that stay together while being cooked, but aren’t too gummy or rubbery. White pepper and five-spice powder give the broth a great flavour, and I heartily recommend adding your favourite vegetables, thinly-sliced, before serving. If you can’t find egg-free wonton wrappers, try using thin dumpling wrappers instead. I’ve used both, and dumpling wrappers are the ones used in the photos above.

Wonton Soup

An original recipe by Agent Minty

Makes 36 wontons

Ingredients:

  • 1/3 block (about 220 g) of medium or “traditional” tofu (not drained)
  • 1/4 can of chopped water chestnuts
  • 1 1/2 Tbsp soya sauce
  • 1/4 tsp ginger paste
  • 1 tsp water
  • 1 coarsely chopped scallion
  • Pinch of ground white pepper
  • 1/4 tsp 5-spice powder
  • 1/2 cup gluten powder (vital wheat gluten, seitan powder, etc)
  • 1 package vegan wonton wrappers
  • 2 scallions, thinly sliced
  • your preferred chopped vegetables: I like baby bok chou, sliced carrots, whole baby corn, and even a bit of cauliflower.
  • ~ 1 Tbsp miso paste
  • 1/4 tsp each ground white pepper and 5-spice powder
  • 2 Tbsp soya sauce

Instructions:

  1. Puree tofu in a food processor for about 20 seconds until mostly smooth but still a bit gritty.
  2. Add water chestnuts, soya sauce, ginger paste, water, chopped scallion, white pepper, and five-spice powder, and pulse a few times until incorporated but not too smooth.
  3. Add in gluten flour and pulse repeatedly until the texture is like cookie dough.
  4. Transfer to a bowl and cover with a lid or plastic wrap, and store at room temperature for 15-20 minutes to let the gluten develop.
  5. Pinch off 1-2 tsp-sized lumps of filling and place in the centre of the wrapper. Wet the edges of the wrapper and press to seal.
  6. Continue filling wontons, laying them on a single layer on a plate or tray to dry slightly.
  7. Prepare chopped vegetables and set aside.
  8. Prepare your broth – the miso paste, pepper, soya sauce, etc. are just recommended amounts for one large or two small servings (about 6 cups of broth). Add garlic, sriracha, ginger, or other seasonings to your taste.
  9. Bring a large pot of water to boil. Toss in the wontons you wish to eat (about 7 or 8 per person), and cook about 5 minutes, until they float.
  10. Meanwhile, transfer chopped vegetable to simmering broth and cook for the last two minutes.
  11. Transfer cooked wontons to the broth and add chopped scallions on top. Serve.
  12. Unused wontons can be frozen, uncooked, and tossed directly into boiling water to thaw when needed.

The Jelly Roll Failure Files

My mom has a yummy Christmas dessert that she has been making since I can remember. Chocolate Mint Yule Log (I know, very 80’s). It’s a chocolate jelly roll filled with minty whipped cream and crushed candy canes, topped with chocolate ganache and more candy cane bits, and served semi-frozen.

And I cannot veganize it yet. I’ve been trying every few weekends for a while now.

Traditionally, jelly rolls are made with sponge cake sheets, as the high egg content makes them stretchy and a little less soggy upon prolonged contact with filling.

The first two attempts, I didn’t take photos. First, I tried mom’s recipe, which used both egg yolks and egg whites. I tried some weird custard powder-aquafaba-psyllium powder mixture from the yolk. The egg whites were made from Aquafaba with Xantham gum added in. I recall that this version stuck to the paper like the dickens, and had large holes. I figured I would next try something that didn’t require egg yolks.

So I tried a modification of a “hot milk sponge” recipe from Joy Of Cooking, with Aquafaba egg white whipped stiff, sugar whipped in, and then a dry mixture of flours and baking powder mixed in.  The second version had no xantham gum added to the “eggs”, and fell flat while folding in the dry powders. It also was crunchy on the top once baked.

The third time, I called my gramma and got her recipe (similar to the Joy of Cooking one). It’s lemon, rather than chocolate, but I figured I’d start with the lemon recipe and go from there. It didn’t collapse when folding in the dry ingredients, but I had upped the Xantham gum. It stayed relatively high, but the op of the cake almost seemed caramelized. Once flipped over for filling, it was full of very large air holes.

Jellyroll-6Jellyroll-7

A few nights ago, I tried gramma’s recipe again, but with some of the flour subbed out for cocoa, and I decided to follow the recipe more closely by using mostly granulated sugar instead of instant-dissolving sugar. However, I goofed and used four times the amount of hot milk – so the batter collapsed as soon as I added it. Undaunted, I baked it anyway, and was rewarded by a thin, gummy sheet. Mme. Minty tried it and said it gave her a stomachache.

Jellyroll-8

I decided to take a different tack and try an already vegan recipe, and make it more like the cake I remember eating in years past. I took the “Wacky Cake” recipe from How it All Vegan and modified the oil and water ratios and added some psyllium powder. It’s a cake that uses leavening from vinegar and baking soda, in addition to baking powder. It baked into the perfect thickness. However, I tried rolling it up before it was cool enough, so it broke. I also think that I need to fold in a little bit of “egg white”, to give it a bit more elasticity.

So here I am, five cakes later and not as far ahead as I had hoped. At least the last attempt tastes and looks good; I just need to make it a bit more durable. Have any of you, dear readers, ever made egg-less sponge cake? Have any suggestions? I’m hoping to have a recipe up here soon that will actually work!!

Upside Down Cake for Beginners

UpsidedownCake-8

I know that some of my recipes can be complicated: a lot of steps, exotic ingredients, or both. However, you don’t always need something to be complex in order to be delicious. More importantly, making something vegan, or even just egg-free, doesn’t always require any extra thought. I’m sharing a recipe that’s easy and even a bit fun to make, and will be received with excitement. I created the cake recipe so than you can make it with basic grocery-store ingredients, but nobody will know how basic it is!

UpsidedownCake-2

UpsidedownCake-4

UpsidedownCake-5

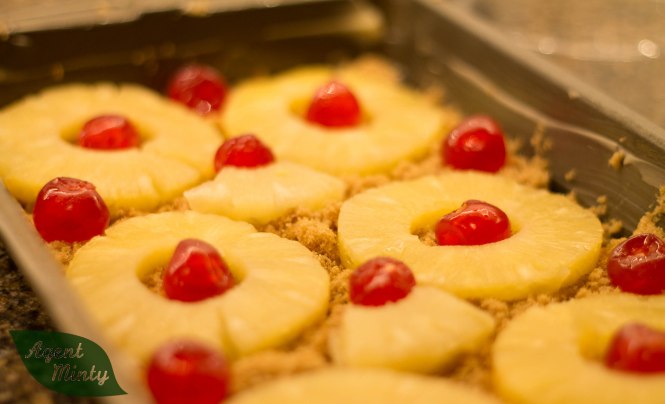
Pineapple upside-down cake is a retro staple, moist and tasty, not needing a layer of icing. If you’re allergic to pineapple or cherries, sub out for another canned or candied fruit. I’m allergic to pineapple, so I made a small cake with canned mandarin orange segments.

UpsidedownCake-3

UpsidedownCake-6

The recipe makes a lot of cake: one large 9×13-inch (lasagna sized) pan, two square 8×8-inch pans, or three (slightly thin) round 8-inch pans. This is a perfect big cake to bring to a potluck, and is equally good eaten right away or after sitting on the counter overnight.

UpsidedownCake-7

UpsidedownCake-9

Once the cake comes out of the oven, you’ll need to let it set a few minutes before you flip it, and may still have some fruit and sugar stick to the pan. This is no big deal! Just use a fork to pick up the stuck fruit, arrange it back on the cake. Scrape up the remaining sugar-goo and use it to fill in any cracks in the surface. After it cools down, no one will be the wiser!

Upside-Down Cake

An Agent Minty original recipe

Ingredients:

  • 1 can of pineapple rings
  • 1/2 cup glace or maraschino cherries
  • 1/4 cup margarine + 1/4 cup + tsp table margarine (becel vegan or similar) divided
  • 1 1/2 cups, packed, brown sugar
  • 1/2 cup + 1 Tbsp vegetable shortening
  • 2 cups superfine sugar (buy “berry sugar” or “instant dissolving sugar” but not “icing sugar” or “powdered sugar”. Alternatively, take regular white sugar and pulse in a blender for 20 seconds)
  • 2 Tbsp corn starch
  • 1/3 cup water
  • 2 Tbsp lemon juice
  • 2 tsp vanilla extract
  • 3 cups flour
  • 1 tsp + 4 tsp baking powder, divided
  • 1/2 tsp baking soda
  • 1 tsp salt
  • 2 cups almond or other milk

Instructions:

  1. Preheat oven to 350F.
  2. Drain fruit and place on paper towels to further dry during the next step.
  3. Spread 1/4 cup of margarine on sides and bottom of large 9×13 pan or two smaller pans.
  4. Sprinkle brown sugar over bottom of pan over margarine.
  5. Arrange drained fruit in an attractive pattern, leaving a few spaces for the cake batter to peek through.
  6. Cream remaining margarine with shortening and white sugar.
  7. In a small cup, combine corn starch, water, lemon juice, vanilla extract, and 1 tsp baking powder.
  8. Pour into margarine mixture and beat until white and opaque.
  9. In a bowl, combine flour, remaining baking powder, baking soda, and salt.
  10. Add 1/3 of dry mix to bowl, beat until mostly mixed.
  11. Add half of the milk and mix, then repeat steps 10 and 11 until everything has been incorporated. The finished batter will be a little stiff – not runny like from a cake mix.
  12. Scoop into pan(s) and smooth the surface of the batter evenly.
  13. Bake in the centre of the oven until a toothpick inserted in comes out clean. Small pans: ~26 minutes, large pans, ~35 minutes.
  14. Let pan sit for 3 or 4 minutes on a cooling rack. Place a cooling rack or platoon top of cake, and flip together to unfold cake.
  15. Pick out and arrange any fruit or caramel that stuck to the pan.

Perogies for Thanksgiving

Perogies on a plate with fall decor

Perogies, Pyrohy, Piroshki, etc., etc. Delicacy of Eastern Europe, particularly of Ukraine. Western Canada is perogy-land, having been settled by a large number of Ukrainians over the last century.

Perogies-5

Perogies-9

They often make an appearance at old-school buffets, and many community halls hold perogy dinner fundraisers. Many people I know also include them at the Thanksgiving table.

Perogies-1

Perogies-2

I learned to love perogies when our family moved away from the prairies to the maritimes, and my mom had to make them from scratch. It was a special-occasion meal because it was more labor intensive. When we moved to Alberta when I was a teenager, perogies beam a convenience food, cooked from a bag from the freezer aisle.

Perogies-6

It wasn’t until I lived on my own that I tried making perogies from scratch myself, but they’re worth the effort (I say that a lot on this blog!!). This recipe is one loosely based on a recipe from the Vegetarian Times cookbook. It’s also a good recipe to make with friends, as many hands speed the assembly stage. Our friend Matt came over when we last made these, and is the lovely hand model in the photos.

Perogies-10

Vegan Cheddar and Chive Perogies

An Agent Minty original recipe

Makes approximately 45 perogies

Ingredients:

  • 1 cup raw cashews, soaked 4 hours to overnight
  • 2 large baking potatoes
  • 1 1/2 Tbsp almond milk
  • 1 Tbsp miso paste
  • 4 tsp apple cider vinegar
  • 2 1/2 + 1 1/2 cups all-purpose flour
  • 1/4 tsp cream of tartar
  • pinch of salt
  • 2 Tbsp olive oil
  • 1 sundried tomato, soaked in water and cut into quarters
  • 1/4 cup nutritional yeast
  • 1/4 tsp turmeric
  • 1/8 tsp garlic powder
  • 1 Tbsp paprika
  • 2-3 Tbsp chopped fresh chives

Instructions:

Prepare components:

  1. Peel and cube potatoes, cover with water and bring to a boil.
  2. Meanwhile, process together drained soaked cashews, until coarse.
  3. Add almond milk, miso, and vinegar and puree for 3-5 minutes until perfectly creamy.
  4. Set aside cashew cream for now.
  5. Once potatoes are cooked until very tender, drain, reserving potato cooking liquid in a bowl.
  6. Mash potatoes until smooth.
  7. Combine 2 1/2 cups of flour with cream of tartar and salt in a large mixing bowl.
  8. Mix 1 3/4 cups of mashed potato with 3/4 cups of potato cooking water and the oil.
  9. Add mixture from step 8 to the flour-salt mixture and stir well.
  10. Either kneading in the bowl by hand, or using your mixer’s dough hook attachment, start kneading the dough.
  11. Add remaining flour in 1/4 cupfuls every minute or so, until the dough is no longer very sticky.
  12. Continue kneading for about five minutes.
  13. Cover dough with plastic wrap to rest while you prepare the filling.
  14. Blend together 1/4 cup of cashew cream from step 4 with remaining mashed potato. Add in remaining ingredients and puree or stir until creamy.

Cut and fill perogies:

  1. Using a generous amount of flour, roll out 1/3 of dough to 1/8-inch thick.
  2. Cut 3-inch circles, and fill each with 1 Tbsp of filling.
  3. Moisten the edge of the dough with water, fold over, and press together with a fork.
  4. Transfer all finished perogies to a tray covered with plastic wrap to keep them moist.
  5. Scraps from cutting dough can be reused.
  6. After all perogies have been cut and filled, bring a pot of water to boil.
  7. Cook perogies in boiling water for 5-8 minutes.
  8. If desired, lightly sauté in oil before serving.
  9. Serve with remaining cashew cream, fried onions, and vegan “bacon” bits.
  10. Leftover boiled perogies store well in the fridge for a week.Perogies-3

Perogies-4

Perogies-7