Mocha Toffee Crunch Vegan Ice Cream

Mocha Toffee IceCream-2

Happy summer! It’s past Solstice now, and alternates here between pouring rain and hot hot sunshine. Which is OK – Edmonton in the summertime is pretty nice. I must be adapting to the heat this year, as only a few times so far have I felt like I would melt if I didn’t watermelon or a popsicle or ice cream into me ASAP.

Mocha Toffee IceCream-3

If you only and up making ice cream rarely this summer, this flavour is definitely a good choice: cool chocolate perked up by a touch of coffee flavour, contrasting with bits of crunchy toffee.

Mocha Toffee IceCream-4

I’ve included a toffee recipe that results in a candy that may seem rather oily, as that acts as the candy’s “raincoat” and prevents it from softening or getting soggy when mixed in to the ice cream. It’s a nice mix of contrasts and a lovely treat on a hot (or cold!) day.

Mocha Toffee IceCream-1

Mocha Toffee Crunch Vegan Ice Cream

By Agent Minty.

Ingredients: 

Ice cream base:

  • 1/4 cup corn starch
  • 1/3 cup brown sugar
  • 1/4 cup cocoa
  • 1c white sugar
  • pinch of salt
  • 1 3/4 cups almond milk
  • 1 Tbsp instant coffee powder
  • 2 cups canned coconut milk

Toffee Bits:

  • 1/3 cup blanched, slivered almonds
  • 3 Tbsp Earth Balance or other hard margarine
  • 2 tsp coconut oil
  • 2/3 cup white sugar
  • 1/4 tsp salt
  • 1 Tbsp golden syrup
  • 1.5 tsp water

Instructions:

  1. Whisk together corn starch, brown sugar, cocoa, 1 cup white sugar, salt, and 2/3 cup of the almond milk in a large saucepan. Heat on medium.
  2. Mix the instant coffee with about 3 Tbs of the remaining almond milk. Add to mixture in saucepan.
  3. Keep stirring mixture until sugar is dissolved and it starts to simmer. Turn down heat to medium-low.
  4. Keep stirring while slowly adding remaining almond milk, then coconut milk.
  5. Cook mixture until slightly thickened and glossy, about 5 minutes.
  6. Remove from heat, and cover surface with plastic wrap to prevent a skin from forming. after cooled slightly, refrigerate for at least three hours.
  7. Toast almonds in a ~350F oven for 2-5 minutes, until lightly golden, then remove to cool, and chop finely.
  8. Melt Earth Balance and oil in a small saucepan, then add sugar, syrup, water, and salt.
  9. Prepare a cookie sheet by lining with aluminum foil and tossing chopped almonds onto an area approximately 12×12 inches.
  10. Stir syrup on medium heat until sugar starts to dissolve, then add a candy thermometer and cook, undisturbed, until the syrup reaches Hard Crack stage (300-309 Fahrenheit).
  11.  Give candy one quick stir with a spatula, then pour over the almonds on the cookie sheet. Use the spatula to sweep any extra almonds onto the toffee area. You will get a thin puddle of candy smaller than the cookie sheet itself.
  12. Allow the toffee to cool for at least one hour before breaking into slivers.
  13. Freeze ice cream base according to instructions for your ice cream machine. Add in toffee bits for the last minute of mixing.
  14. Transfer to a plastic container and freeze overnight before serving.

Happy Easter! Chocolate Egg Inspiration!

ChocEggs-7

I guess that it’s been a rather long hiatus. Excuses, excuses abound, but you’re not here to read those. You’re here to see the goods! And in today’s case, they are totally worth it: vegan easter eggs filled with marshmallow or peanut butter fillings, or solid fruit-and-nut eggs.

ChocEggs-1

The first Easter after I went vegan was hard, because (as I think I mentioned before) I love seasonal candy. Take cheap jelly beans, make them egg shaped and speckled, and I’m sold. I loved Reese’s eggs and those malted-milk Robin Eggs, too. I’m still working on a malt ball substitute, but the eggs I present to you today are a huge hit with my family – I make several dozen to give away.

In order to make these, I had to use a mould, which I bought from Bulk Barn several years ago. As I wrap the completed chocolates in foil and store them in the refrigerator, I didn’t brother to temper the chocolate after melting it. I just used vegan semisweet chocolate chips and melted them in the microwave.

ChocEggs-12

The recipes below fall more into the “unrecipe” category, as the amounts are suggestions; the number of eggs will depend on the size and shape of moulds you use. Mine were the same general shape as a chicken’s egg (but halved).

ChocEggs-5

Finally, the marshmallow recipe that I used produces far more than the filling required for one dozen eggs (I moulded six chocolate shells, popped them out and moulded six more to fill all at the same time). I  experimented with making a vein version of Peeps, those chick shaped, sugar coated marshmallows. They are in some of my photos above, but they look more like chick-elephant hybrids. The rest of the marshmallows I made into traditional cylindrical mallows. To get the pastel fine sugar, I just pureed coloured sanding sugar in a spice grinder until it was a coarse powder.

ChocEggs-6

Ok, so here goes:

Chocolate Easter Eggs

A collection of original recipes by Agent Minty

Marshmallow Eggs (Vegan version of Russell Stover Eggs)

Makes 12 or more eggs, plus extra marshmallow filling

Ingredients:

Instructions:

  1. Melt chocolate in microwave and use 1-2 tsp per cavity to line walls.Freeze for 5 minutes.
    ChocEggs-9
  2. Check to see if chocolate is thick enough. If you can see light through, add another thin later and chill for another 5 minutes or more.
  3. Prepare marshmallow filling according to recipe and transfer 2 cups to a large piping bag with no tip.
  4. Dollop about 2 Tbsp of rolling per moulded egg.
    ChocEggs-10
  5. Using a damp fingertip, smooth top of marshmallow down to better fill egg mould.
  6. Chill for at least 10 minutes.
  7. Re-melt chocolate and smooth chocolate over marshmallows, paying special attention to edges of the first half shell.
  8. Chill for at least 20 minutes before removing from mould and wrapping with foil.
  9. Optional: Pipe out remaining marshmallow mix onto sheets of parchment paper coated with fine sugar. Toss with more sugar. If cutting long tubes into short marshmallows, let cure for at least 30 minutes before cutting with scissors. Cure, uncovered, overnight for best texture.

ChocEggs-11

Peanut Butter Eggs (Vegan version of Reese Eggs)

Makes 20 or more eggs. Scale as needed.

Ingredients:

  • 2 1/2-3 cups dark chocolate chips
  • 1 cup peanut butter
  • 3/4 cups + 1 Tbsp icing sugar
  • 3/8 tsp salt (if the peanut butter you use has salt, cut to 1/8 tsp)
  • 2 Tbsp packed brown sugar

Instructions:

  1. Melt chocolate in microwave and use 1-2 tsp per cavity to line walls.Freeze for 5 minutes. Coat a second time if needed.
  2. Mix together remaining ingredients until a smooth paste forms.
  3. Press 2-3 tsp of filling into each cavity and top with more melted chocolate.
  4. Store excess peanut butter filling in fridge between uses.
  5. Chill for at least 20 minutes before removing from mould and wrapping with foil.
  6. Repeat steps 1 and 3 to make more eggs as desired.


Fruit and Nut Eggs (Vegan version of Cadbury Fruit&Nut Bar)

Makes 8 or more eggs. Scale as needed.

Ingredients:

  • 1 1/2 cups dark chocolate chips
  • 6 Tbsp blanched, slivered almonds
  • 1/4 – 5Tbsp raisins

Instructions:

  1. Toast slivered almonds for about five minutes until light brown.
  2. Coarsely chop raisins and toasted almonds.
    ChocEggs-13
  3. Melt chocolate and stir in chopped raisins and almonds.
  4. Fill moulds. Tap on a counter to remove air bubbles.
  5. Chill at least 30 minutes before removing from mould and wrapping with foil.
  6. Re-warm chocolate mixture briefly if needed to fill more moulds.


ChocEggs-8

Happy Easter!

OMG VEGAN MARSHMALLOWS!!!

This is what has been missing in your animal-free life:

Marshmallow-5

It isn’t an animal product, it’s a homemade marshmallow. Soft, fluffy, sweet. Toastable.

Marshmallow-3

Delicious for piping onto cupcakes and making, say, s’mores-themed desserts.

Marshmallow-1

You CAN make these at home. Some of the ingredients are slightly exotic, but easy enough to find at any organic or health food store. The magic ingredient is the juice from a can of chickpeas, known by many vegans as aqua faba. This whips up to fabulous, magical fluffy mock egg whites and serves as the base for the marshmallows, along with a few other ingredients.

Marshmallow-10

Next you beat in a hot syrup to make the candy, and then add in an agar-agar solution (instead of the traditional, animal-based gelatine). After a good amount of beating, the mixture will “vulcanize” and you’ll be ready to make marshmallows. Some recipes advise pouring it into a pan and cutting them into cubes, but I found that this makes a wet mess. Piping them into “kisses” provides more surface area, helping them dry properly.

Marshmallow-7

Marshmallow-9

I found the recipe originally on Seitan Is my Motor, but made a few modifications. Please read their link for more information… the more you read in preparation, the more likely it is to go smoothly!

In addition, I’ve provided a recipe below for some crazy-good s’mores cupcakes. These have a graham cracker-flavoured cake with a soft chocolate ganache, topped with toasted marshmallow. I thought they would be best fresh, but they are even more delicious if assembled the night before and allowed to sit at room temperature overnight before serving. Pull these babies out when you want to seriously impress people.

Marshmallow-2

Vegan Marshmallows – Modified from Seitan is my Motor

Ingredients:

  • 1/2 cup + 1/4 cup water
  • 1 cup white sugar
  • 1/4 tsp cream of tartar
  • 1/3 cup golden cane or corn syrup (or half white corn syrup and half golden, but NOT ALL white corn syrup)
  • 1/2 cup juice from canned chickpeas
  • 1 tsp Xanthan gum
  • 1/4 tsp lemon juice
  • 1 tsp vanilla extract
  • 2 tsp agar powder
  • Icing sugar
Specialized equipment:
  • Stand mixer with whisk attachment
  • Candy thermometer
  • Two small/medium saucepans
  • Large piping bag
  • Waxed paper
Instructions:
  1. Combine 1/2 cup water and sugar in a medium pot. Whisk until combined.
  2. Stir in cream of tartar and syrup.
  3. Heat on medium, stirring once or twice, until mixture comes to a boil.
  4. Continue to simmer without stirring, and place a candy thermometer in the pot to measure temperature.
  5. Occasionally rush down splattered syrup from sides of pot with a brush dipped in water, and allow syrup to cook until it reaches 248F/120C. This will take five to ten minutes.
  6. Meanwhile, combine chickpea juice, Xantham gum, and lemon juice in the bowl of your mixer with a whisk attachment.
  7. Whisk chickpea mixture until it is stiff, about 2 minutes.
  8. Add vanilla at beat for another two minutes.
  9. Whisk together agar powder and 1/4 water in a small saucepan, and turn heat to low.
  10. While still monitoring the syrup temperature, gently stir to agar mixture without letting it come to a simmer.
  11. Once the syrup has reached 248F/120C, turn on mixer with chickpea foam inside. Slowly pour hot syrup into the mixing foam.
  12. Beat on high speed for two-four minutes, while finishing the agar mixture.
  13. Bring the agar to a simmer. Stir in 1 tsp more water.
  14. Using your wet brush to wash any specks of agar the are on the sides of the pot while continuing to cook.
  15. To test whether agar is ready, dip a fork into the solution and wave in the air to slightly cool off. When you taste the mixture, it should be smooth and not gritty.
  16. Once the agar is ready, pour/scrape into the running mixer.
  17. After incorporating the agar, pause mixer to scrape down the sides of the bowl.
  18. Resume beating the mixture at high speed for at least five minutes, until the mixture is cooled to just above room temperature. You will notice that a bit of the mixture, when spooned out and waved around to cool, starts to get a bit rubbery.
  19. Scoop mixture into a large piping bag without a tip.
  20. Dust a sheet of waxed paper with icing sugar.
  21. Pipe dollops (about 1 Tbsp in size) of mixture onto the sheet; if you wish you can also pipe onto prepared cupcakes (see below).
  22. For loose marshmallows, sift with icing sugar and allow to cure at room temperature, uncovered, for at least a day.

S’mores cupcakes – An original recipe by Agent Minty

Ingredients:

Cupcakes

  • 70g vegan graham crackers (about 4.5 large sheets)
  • 3/4 cup + 3 Tbsp white flour
  • 2 tsp baking powder
  • 1/2 tsp baking soda
  • 1 tsp cinnamon
  • 1/2 tsp salt
  • 1/3 cup Earth Balance/non-dairy hard margarine
  • 6 Tbsp brown sugar
  • 1/2 cup white sugar
  • 1 1/4 tsp vanilla extract
  • 6 Tbsp water
  • 3 tsp egg replacer powder
  • 2 Tbsp (40g) light syrup (non vegans could use creamed honey), melted
  • 2 Tbsp canola oil
  • 1 1/2 Tbsp lemon juice
  • 1/4 cup non-dairy milk

Ganache

  • 1/4 cup coconut cream from a can
  • 2.3 cup chocolate chips

Prepared Marshmallow mix from above (Do not prepare until cupcakes and ganache have been assembled)

Instructions:

  1. Preheat oven to 375F.
  2. Process graham crackers in a food processor to get fine crumbs – This should make 1/2 cup +3 Tbsp.
  3. Combine crumbs with flour, baking powder, baking soda, cinnamon, and salt.
  4. Cream together margarine, brown sugar, and white sugar in a stand mixer.
  5. Whisk together vanilla, water, and egg replacer until slightly frothy. Add to butter mixture.
  6. Mix honey, canola oil, and lemon juice to butter mixture, stirring until well combined.
  7. Add in half of flour mixture, stirring until evenly mixed.
  8. Scrape down bowl and add milk, mixing well.
  9. Mix in remaining dry mixture.
  10. Divide mixture between 12 lined muffin tins.
  11. Bake for 20-22 minutes, rotating once, until a toothpick inserted into cupcake come out dry.
  12. Remove to cooling rack and cool for at least an hour (prepare ganache at this time).Marshmallow-8
  13. Heat coconut cream in a saucepan or in the microwave until hot but not boiling.
  14. Stir in chocolate chips until melted.
  15. Set aside to cool for at least one hour.Marshmallow-6
  16. Scoop a tablespoonful of ganache onto the centre of each cupcake.
  17. Set cupcakes in the refrigerator to harden ganache for at least 20 minutes, while making marshmallow mixture.
  18. Pipe a generous amount of marshmallow on top of each cupcake.
  19. Allow to cure at room temperature for at least an hour.
  20. Using a torch, toast the surface of the marshmallows before serving.

Marshmallow-4

Pi Day

You all know March 14 is Pi day, right? 3/14 (to the part of the world that is crazy and writes dates backwards like that), similar to 3.14, the rounded-off value of Pi. Geeks celebrate by eating pies!

I was busy during the day, and didn’t get around to posting a picture of the pie I made on time yesterday, but here it is. Sorry about the lousy picture, but I was in a hurry to snap a picture before Mme. Minty started devouring it!

pie

I veganized this recipe I found online, and it was delicious… Chocolate Almond Strawberry Linzertorte. It is a variation on the classic german tart made with an almond-based crust and jam filling. The crust is closer to a cookie than pastry, and it has a dense, rich flavour.

I hope you all had a great 3/14/15 🙂

Dream Date Cookies

As the stores are already littered with Valentine’s Day displays, memories come to mind of my childhood ideas about what “romance” meant. Flowers, dinners in fancy restaurants, and, for some bizarre reason, having a date who would appreciate it when I wore pantyhose (I think I associated it with being grown up). And of course the mysterious lover would be attractive, sweet, think I was funny.

I did and up marrying someone I love, who is sweet, beautiful, and has a sense of humour. Sure, flowers and fancy dinners happen sometimes, but the love and romance stems from more than that. Coming home during a stressful week and her playing an album on the stereo that I told her I’ve been thinking of for a while. Picking up her favourite candy when I’m out running errands. Taking the time to learn about and become interested in each others’ hobbies. After nearly a decade, love still isn’t boring. Making cookies for each other helps, too.

Dream Date Cookies (4 of 5)

These cookies could be described as a cross between chocolate shortbread and a trail mix cookie, with lots of chocolate flavour. Share them with whomever you love.

Dream Date Cookies (5 of 5)

Double-Chocolate Dream Date Cookies – An original recipe by Agent Minty

Ingredients:

  • 2/3 cup rolled oats
  • 1/4 tsp salt
  • 3/4 cup white flour
  • 2 Tbsp finely grated coconut
  • 2 Tbsp cocoa powder
  • 1/2 tsp baking powder
  • 1/2 cup soft margarine
  • 1/3 cup packed brown sugar
  • 2 Tbsp white sugar
  • 1 tsp vanilla
  • 1 tsp egg replacer + 2.5 Tbsp water, mixed well
  • 1/2 cup chopped dates (cheap ones are fine)
  • 1/4 cup + 2 Tbsp chocolate chips

Instructions:

  1. Preheat oven to 350F.
  2. Process rolled oats in a blender or food processor until they are a coarse, uniform flour (think bran flake size).
  3. Combine oat flour in a bowl with salt, flour, coconut, cocoa, and baking powder.
  4. Cream together margarine, brown sugar, and white sugar.
  5. Add in vanilla and “egg” and beat until fluffy.
  6. Mix in dry ingredients.
  7. Stir in chopped dates and chocolate chips.
  8. Drop in 2-Tbsp piles on a parchment-lined cookie sheet.
  9. Bake for 12 minutes in the middle of the oven, rotating sheets halfway through.
  10. For best texture, cool completely before eating.

Dream Date Cookies (3 of 5)

Christmas Ice Cream – Candy Cane Crackle

Canadian readers will probably be familiar with President’s Choice Candy Cane ice cream. It came out in 1995 and was immediately my favourite ice cream ever. Rich vanilla ice cream with chunks of candy cane and ribbons of hard chocolate that crackled when you scooped some out. Our whole family looked forward to eating it for dessert in December. It underwent a redesign about five years ago and hasn’t been the same since – now the ice cream is minty, there are red and green globs of candy instead of broken candy canes, and the ice cream itself isn’t as rich. I don’t have a picture of the old version, but here’s what it looks like now:

PC brand - little red paperclip

I have tweaked the recipe over the past two years until it is as creamy and crackly as I remember. It is with pride that I’m sharing it with you now… hopefully it will be a Christmas favourite with your family, too!

IMG_2558

Christmas Crackle Ice Cream

The vanilla base is modified from the French Vanilla ice cream in Hannah Kaminsky’s Vegan a la Mode, but the rest of the ideas are my own. Note that this recipe makes a large batch of ice cream – lots to share!

Ingredients:

  • 5 1/2 Tbsp Bird’s custard powder (for whiter ice cream, use half custard powder and half corn starch)
  • 1 cup soy milk or almond milk
  • 3/4 cup white sugar
  • 2 cups almond milk
  • pinch salt
  • 1 can gold (high-fat) coconut milk, left in a cool place to separate
  • 3/4 tsp vanilla paste, or 1 tsp vanilla extract
  • 3 Tbsp vodka
  • 1 Tbsp coconut oil, or shortening
  • 6 Tbsp chocolate chips
  • 3/4 to 1 cup of crushed green and red candy canes (red only is fine, the addition of green is just prettier to me)

Instructions:

  1. Whisk the custard powder and 1 cup of milk in a saucepan until thoroughly dissolved.
  2. Stir in the sugar.
  3. Slowly warm the mixture on low to medium heat, whisking the whole time.
  4. Once the sugar has dissolved, bring heat to medium.
  5. Add in remaining almond milk and salt.
  6. Stir until the mixture thickens.
  7. Meanwhile, scoop out fatty portion of coconut milk (should be 1 1/4 to 1 2/3 cups) and microwave for 30 seconds to soften.
  8. Once the mixture on the stove is the consistency of a light pudding, take off the heat.
  9. Stir in coconut milk and vanilla.
  10. Allow to cool for 10 minutes, whisking occasionally.
  11. Add in vodka.
  12. Cool for at least two hours, stirring occasionally to break up the “skin” that forms.  If you forget to stir, just whiz the mixture for a few seconds with an immersion blender before freezing.IMG_2533
  13. Pour the chilled mixture into your ice cream maker and freeze until the ice cream is quite stiff.
  14. Meanwhile, melt together the chocolate chips and coconut oil
  15. Add the crushed candy canes and mix in the ice cream maker for only about one minute. Adding the candy canes too early will allow them to bleed – you’ll get grey ice cream!
  16. Scoop out about half a cup of ice cream, drizzle melted chocolate in thin strings on top. Aim for thin layers!IMG_2543
  17. Repeat until all of the ice cream is used up. You’ll have a little chocolate left over.
  18. Freeze for at least two hours.

Enjoy! Merry Christmas!

ice cream closeup

Nephew Cookies

I announce that I’m back to blogging, and then what happens?

I have a string of kitchen failures: VegNews’ vegan eclairs, after two tries, still end up mediocre; tortillas that stick and burn to the pan; mock chicken noodle soup that looks unmentionably unappetizing (but tasty).

I catch a raging cold/pinkeye from my wife and am out of commission for nearly two weeks.

But I’m mostly on the mend, and nothing makes me feel better than making something in the kitchen. As it is a long weekend, I have lots of time to play. I don’t feel like inventing something new, so I’m just sharing some old favourites. Today I made cookies invented by my wife with our nephew a while back. We had little of any particular baking ingredient left, so they combined them all to make something delicious. We actually refer to these as “_____’s cookies”, but since this nephew is now a pre-teen who spends way too much time online, we’ll keep him anonymous. Anyway, these are great with a mug of tea on an autumn afternoon, or shared with young chocolate-loving relatives.

Nephew cookies

Nephew Cookies 

Makes 2 dozen cookies.

If using powdered egg replacer, take the time to really beat the mixture until frothy.
If you prefer thin, chewy cookies, use the higher amount of margarine, if you prefer softer, puffy cookies, use the lower amount.

  • 1/3 to 1/2 cup vegan margarine or butter
  • 1/2 cup firmly backed brown sugar
  • 1/2 cup white sugar
  • 1 “egg”
  • 1 1/2 tsp vanilla
  • 1 cup +2 Tbsp flour
  • 1/2 tsp baking soda
  • pinch salt
  • 1 tsp grates nutmeg
  • 1/2 cup chocolate chips
  • 1/3 cup blanched, salted peanuts
  • 1/3 cup whole almonds
  • 2 Tbsp smooth peanut butter
  • about 1/4 cup dark chocolate melting wafers
  1. Preheat oven to 350F.
  2. Cream together butter and both sugars.
  3. Whisk egg well and add to butter mixture, along with vanilla. Mix well.
  4. Add in flour, baking soda, salt, and nutmeg. Mix well.
  5. Stir in chocolate chips, peanuts, and almonds.
  6. Drop in 2-inch mounds on a greased cookie sheet. Press a melting wafer into the centre of each cookie.
  7. Bake for 14 minutes, rotating cookie sheets halfway through.
  8. Allow cookies to firm up for 5 minutes before transferring to a wire cooling rack.

Peanut Butter Chocolate Hi-Hat Cupcakes

Love chocolate and peanut butter together? So do I. Yum. However, I’m not a huge cupcake fan. I’ll eat them, sure, but if I’m making something for myself, I would more likely make a tart, ice cream, candy, or cookies. I made these for a lab meeting at work, though, and my colleagues love cupcakes – especially any featuring chocolate.

Sink your teeth into these chocolatey cupcakes topped with whipped peanut butter icing and chocolate shell.

IMG_1483

So yummy… when you bite into them, you get a creamy, nutty surprise:

IMG_1480

These would be perfect for a fancy occasion like a birthday party or for a potluck.


Agent Minty’s Peanut Butter Hi-Hat Cupcakes

Makes 18 medium cupcakes

Quick rich chocolate cupcakes (modified from Joy of Cooking)

  • 2 1/4 cups of white flour
  • 1 3/4 cups white sugar
  • 9 Tbsp cocoa
  • 1 1/2 tsp baking soda
  • 1/8 tsp salt
  • 1.5 cups cold water
  • 1 Tbsp instant coffee granules
  • 6 Tbsp canola oil
  • 1.5 Tbsp balsamic vinegar
  • 2 tsp vanilla
  1. Whisk together flour, sugar, cocoa, baking soda, and salt in the bowl of a stand mixer.
  2. Combine water, coffee granules, oil, vinegar, and vanilla
  3. Pour liquid ingredients into dry and mix until smooth.
  4. Pour into cupcake liners.
  5. Bake at 350F for 17-19 minutes, until a toothpick comes out clean.
  6. Allow to cool for at least 45 minutes.

Peanut butter whipped frosting

To get the creamiest consistency, I recommend using the cheap no-stir homogenized peanut butter. I use the natural stuff on my toast, but it’s famous gritty texture will interfere with your frosting here.

  • 3 1/2 Tbsp margarine (any kind is fine)
  • 2.5 Tbsp of smooth peanut butter
  • 3/4 tsp vanilla
  • 1/2 tsp almond extract
  • 3 1/3 c icing sugar
  • 5 Tbsp almond milk
  1. Cream together the first four ingredients.
  2. Add in icing sugar 1 cup at a time, alternating with milk.
  3. Whip until a mousse-like texture has been achieved
  4. Transfer to a piping bag with a large tip  and place a large dollop on top of each cupcake.
    • Alternatively, use a spoon or a freezer bag with the corner cut off.
  5. Freeze topped cupcakes for at least one hour.

IMG_1455

Chocolate shell

Try to make this in a 2-cup container – wide enough to fit your fingertips, and deep enough to fit the frosted top of the cupcake. You will end up making more chocolate sauce than you will need. Try Adding extra coconut oil to the leftovers to make your own Magic Shell topping for ice cream.

  • 2 cups of vegan chocolate chips, divided
  • 2.5 Tbsp coconut oil, divided
  1. Melt half of each ingredient together in a heat-proof container in your microwave (3 30-second bursts should do it).
  2. Take a frozen, topped cupcake and dip into the chocolate sauce.
  3. Drip off the extra.
  4. While the chocolate is still wet, place on any decorations you want. I used salted roasted peanuts.
  5. Return cupcakes to the freezer, or keep out for immediate consumption.
  6. Allow cupcakes to thaw for 2 hours before serving. They will stay good for about 10 hours at room temperature, but the chocolate shell will get a little soft.

IMG_1462 IMG_1464 IMG_1466 IMG_1467 IMG_1468 IMG_1469

By the way, sorry for the lack of budget or healthy eating posts lately. With my busy schedule, most of my meals have been repeats of the staples – vegan homemade wieners, bean salad, spaghetti, or tinned soup. Cheap, yes, but not so interesting. We have a two-week break in the renos while we wait for a new counter, so hopefully in the meantime I’ll get inspired to document some weeknight cooking!

Happy Birthday to Me!

I love cake and sweets.

How better to commemorate my quarter-century on earth than by bringing in a cake to share with my friends at work?

I wanted to make something impressive and fancy, but also tasty. In other words, I wanted to show off! It’s my day, dammit, so I’m allowed!

I decided to go with the flavour combination of Chocolate Orange – two great tastes that taste great together! I used the Vegan Chocolate cake and Vegan Orange cake recipes from Joy of cooking, as they are both easy and tasty. I made a 10″ (I think) round cake, because I don’t have an appropriately-sized rectangle pan, and I find round cakes require less trimming and waste.

There were two chocolate layers and one orange one, and each layer was split in half and filled. I made a whipped chocolate ganache to fill the orange layer.

I made orange curd for the first time as a filling for the chocolate layers. While I liked the overall texture and flavour of the orange curd, I expected it to be zestier (this could be remedied by substituting more orange juice for the water, and adding some lemon juice). As well, I used a peeler-style zester, which resulted in very long strings of zest. I would recommend using a grater or microplane-style zester instead.

I froze the cakes after making, splitting, and cooling them, since I think vegan cakes tend to stale faster than traditional ones, and I had made them two days in advance.

Everything was assembled with chocolate buttercream, and topped with a dark chocolate glaze. Yummy!

I was also fortunate enough to spend my birthday with my family. Knowing my penchant for carbohydrates, they made me a dinner full of my childhood favourites: macaroni and cheese, greek salad, and garlic bread! For dessert we had an old family favourite, Mud Pie

I felt so loved that my family took the time to get together, and make me dinner, on a work night. You guys are the best!

I especially want to thank my mom and dad for all of the love and guidance they have given me. I know now how lucky I am to have had such a great family life.

Here’s to another year of growth, learning and happiness!

Recipe: Orange-Chocolate Birthday Cake

Chocolate Vegan Cake (from Joy of Cooking) – For the cake I made, I repeated this recipe twice:

Ingredients:

– 1 1/2 cups All-purpose flour

– 1 cup plus 2 tablespoons Sugar

– 6 tablespoons Cocoa powder

– 1 teaspoon Baking soda

– 1/8 teaspoon Salt

– 1/4 cup Vegetable oil

– 1 cup Cold water

– 1 tablespoon White vinegar

– 2 teaspoons vanilla

Directions:

  1. Preheat the oven to 350F.
  2. Prepare a 9 or 10-inch spring form pan by lining with paper and spraying with non-stick cooking spray.
  3. Combine dry ingredients and mix on low speed until well “sifted.”
  4. Combine the wet ingredients and add to the dry.
  5. Stir on medium-low speed until smooth.
  6. Scrape into your prepared pan. Drop on the counter a few times to remove air bubbles.
  7. Bake for 30-35 minutes.
  8. Remove from the oven when a toothpick comes out clean.
  9. Cool for 5 minutes on the rack.
  10. Slide a knife around the edges of the pan. Remove the sides of the pan.
  11. Keeping the cake on the parchment paper, slide it off the bottom and on to a cooling rack.
  12. Wait approximately 15 minutes before peeling off the parchment paper liner.
  13. Cut the cake horizontally in half FIRST, then cut off the dome of the top. Doing it in this order gives you a stiffer top half when manipulating them.
  14. Place plastic wrap between the layers (multiple spatulas may come in handy at this point!) to prevent them from sticking back together.
  15. Wrap tightly and freeze, if desired.
  16. When thawing frozen cake, allow to come to almost room temperature (no more condensation on the plastic wrap) before removing the wrappings.

Ultra Orange Cake (from Joy of Cooking):

Ingredients:

– 1 1/2 cups All-purpose flour

– 1 cup Sugar

– 1 teaspoon Baking soda

– 1/2 teaspoon Salt

– 1/3 cup Vegetable oil

– 1 cup Orange juice

– Zest from one large orange (about 2 tablespoons)

– 1 tablespoon Cider vinegar

– 1 teaspoon vanilla

Directions:

  1. Preheat the oven to 350F.
  2. Prepare a 9 or 10-inch spring form pan by lining with paper and spraying with non-stick cooking spray.
  3. Combine dry ingredients and mix on low speed until well “sifted.”
  4. Combine the wet ingredients and add to the dry.
  5. Stir on medium-low speed until smooth.
  6. Scrape into your prepared pan. Drop on the counter a few times to remove air bubbles.
  7. Bake for 30-35 minutes.
  8. Remove from the oven when a toothpick comes out clean.
  9. Cool, cut, wrap, and freeze as described above.

Whipped Chocolate Ganache Filling:

Ingredients:

– 3/4 cup High-quality coconut milk (gold can, but room-temperature and SHAKEN before opening)

– 160g Dark chocolate chips

Directions:

  1. Heat the coconut milk in a heavy-bottomed saucepan, on medium heat.
  2. Once the milk is simmering, remove from the heat.
  3. Pour the hot milk over the chocolate chips in a heat-proof bowl.
  4. Stir with a spatula until the ganache is a shiny, dark brown.
  5. Chill for an hour or more.
  6. Whip the mixture with the whisk attachment of a stand mixture until the topping is the texture of soft whipped cream
  7. Use to fill the orange cake layers.

Orange Curd Filling (original by Agent Minty):

Ingredients:

– 1/2 cup Sugar

– 3 tablespoons Bird’s custard powder

– Zest of 1 large orange

– 1/3 cup plus 1/2 cup Orange juice

– 1 cup Water

– 2 teaspoons Arrowroot powder

– 1 tablespoon Coconut milk

Directions:

  1. Combine sugar, custard powder, orange zest, and half of the orange juice in a saucepan.
  2. Whisk over low heat until sugar and custard powder are dissolved.
  3. Add the water and stir.
  4. Bring heat to medium under saucepan.
  5. Bring the mixture to a low simmer.
  6. Dissolve the arrowroot powder in the remaining orange juice.
  7. Add the arrowroot-orange juice mixture to the saucepan. Whisk well.
  8. Add the coconut milk.
  9. Whisk wile heating until the mixture boils gently. You may need to increase the heat slightly.
  10. When the mixture is the consistency of yogurt (?), take it off the heat. It will continue to thicken as it cools!
  11. Whisk occasionally until the curd is lukewarm.
  12. Scrape into a container and store in the refrigerator until needed.
  13. Use to fill the chocolate cake layers.

Chocolate Buttercream (adapted from the Purity Cookbook):

Ingredients:

– 10 tablespoons Softened margarine (use higher-quality stuff, like Earth Balance brand)

– 1 1/2 teaspoons Vanilla

– Pinch of salt

– 1/2 cup plus 1 tablespoon cocoa powder

– 9 cups icing sugar

– 1/2 cup room-temperature coconut milk

Directions:

  1. Beat the margarine, vanilla, and salt together until fluffy.
  2. Mix together the cocoa powder and the icing sugar.
  3. Add 1/3 of the dry mixture to the butter mixture.
  4. Beat on medium until incorporated.
  5. Add half of the coconut milk.
  6. Beat on medium until incorporated.
  7. Add another portion of the dry mixture.
  8. Beat on medium until incorporated.
  9. Add the remaining coconut milk.
  10. Beat on medium until incorporated.
  11. Add another portion of the dry mixture.
  12. Beat on high until fluffy.
  13. Adjust the consistency of the icing as desired by adding more “milk” or icing sugar.
  14. Use to paste together the cake layers, and frost the outside of the cake. An offset spatula really helps!

Chocolate Glaze (from Dad):

Ingredients:

– 1 cup Chocolate chips

– 3 tablespoons Hot coffee

– 3 tablespoons Softened margarine (I used the high-quality kind)

– 1 tablespoon Orange liqueur, orange extract, or extra coffee.

Directions:

  1. Melt the chocolate chips on low heat, preferable in a double boiler.
  2. Brew the coffee.
  3. Add the hot coffee to the melted chocolate and stir. This will look terrible, but don’t despair!
  4. Add the margarine and stir rapidly. Aha, you’re getting an emulsion!
  5. Add the flavouring and stir some more.
  6. If you want this runner, add more hot coffee.
  7. Drizzle all over the cake or anything else that could use some pizzazz.

Friendship Pie

My friends are great. They are there to call when I need a second opinion about something, or to cheer me up when I’m feeling lonely.

They are beautiful and talented in diverse ways, and I’m lucky to have them in my life. The nice thing is that they will introduce me to new friends, and so the circle grows even bigger over time.

Last night I went to a dinner party at Ali’s house. Between the six of us there, the meal needed to be gluten- and nut-free, and vegan. I volunteered to make dessert because I like a challenge! I learned a lot while making this pie, and because of it’s accommodating nature for the sensitivities of my friends, I’m calling it Friendship Pie.

While looking around for Nanaimo bar ideas a few weeks ago, I found the Daring Bakers challenge hosted by Lauren of Celiac Teen. I realized that the gluten-free graham crackers would make an excellent base for a crumb-crust pie.

The recipe called for rice, tapioca, and sorghum flours. The bulk store I shop at doesn’t carry sorghum flour, so I used coconut flour instead. Apparently it’s just powdered dried coconut meat! Consequently, while I was mixing up the dough, the kitchen had the wonderful aroma of coconut. I had to veganize it, and adapt it for what I had available in my kitchen.

This was my first time baking gluten-free, and I found the texture of the dough to be unusual – almost crunchy (I am an incorrigible cookie dough eater). They also took about half of the time Lauren recommended for baking.

The recipe made approximately 2 and a half dozen crackers; enough for Annick and I to snack on for two days, plus enough for a thick pie crust and some to give to my friend.

I used the recipe from Veganomicon for the pie crust, which uses yet more coconut! I didn’t bake it for as long as recommended, because I wanted a crust that wasn’t too crumbly. My graham crackers were also well-done, so I didn’t want the crust to taste burnt.

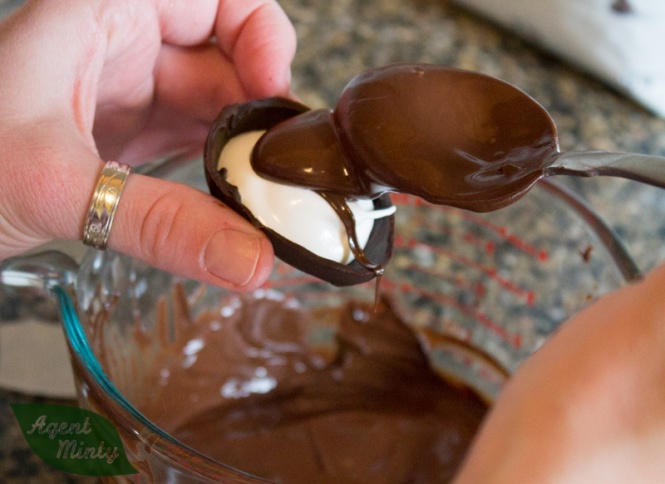
The ganache filling of the pie is a result of a happy accident. In December I tried to make ginger truffles, but the ganache never set firmly enough. As a result, I had a creamy ganache to use as a filling for my Christmas bûche, and I use the same chocolate-coconut milk proportions for an easy, rich filling.

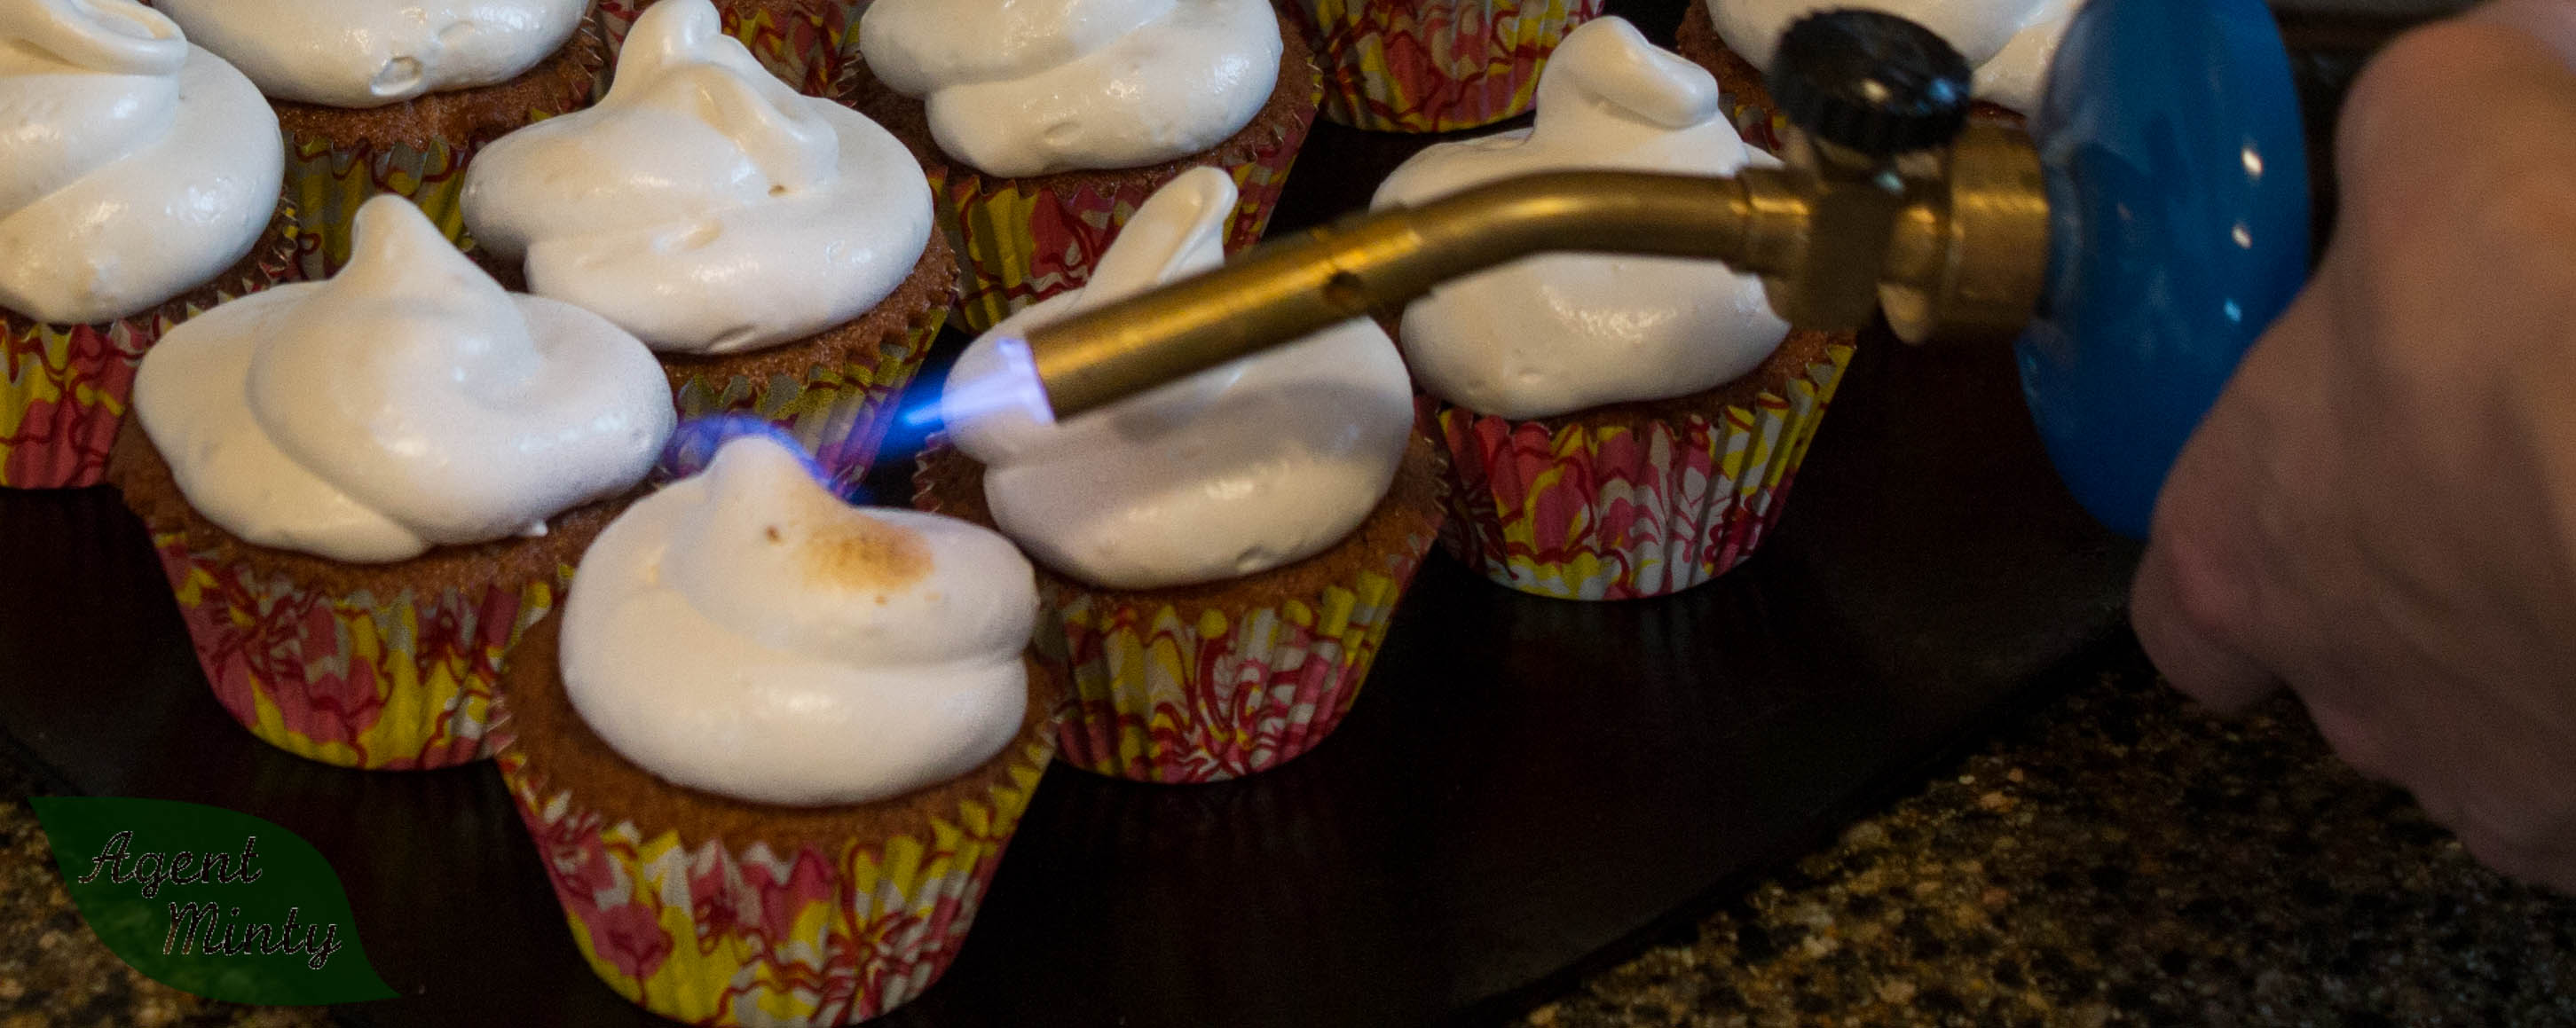
For the final fancy garnish on the cake, I wanted to make white chocolate mousse.

My last attempt at making white chocolate was unsuccessful, but I had a PLAN this time! I made paste with a small volume of coconut milk and the soymilk powder, stirring and pressing with a spatula until all of the lumps were dissolved. To this I added the vanilla and powdered sugar, again making sure that the sugar was dissolved before proceeding.

I then added more coconut milk, because I wanted this to be a whippable custard (?), not a solid chocolate. Next I added the cocoa butter and stirred it until I got an emulsion, then added MORE coconut milk. I let this chill in the fridge so that it would be easier to whip, and meanwhile relaxed.

Once the mixture was the consistency of thin yogurt, I whipped it as much as I could. It didn’t whip as well as coconut cream, but it did get airier. I filled up a tube with it, and piped it onto the pie.

Result: One tasty pie, and several “oh my god this is so good!” comments.

Friendship Pie, dedicated to all my friends, old and new!

Recipe: Friendship Pie

Graham Crackers (Adapted from Celiac Teen):

Ingredients:

– 1 cup Sweet rice flour
– 3/4  cup Tapioca Starch/Flour
– 1/2 cup Coconut Flour
– 1 cup Brown Sugar, Lightly packed
– 1 teaspoon Baking soda
– 3/4 teaspoon Salt
– 7 tablespoons Margarine (I just used the normal soft kind)
– 1/3 cup Honey, or half honey and half corn syrup
– 5 tablespoons Soymilk
– 2 tablespoons Vanilla Extract

Directions:

  1. Mix all dry ingredients together.
  2. Cut the margarine into the dry ingredients with a pastry cutter until the mixture resembles fine cumbs.
  3. Combine all wet ingredients in a mixing cup and add to the dry ingredients.
  4. Mix with a wooden spoon or electric mixer until well combined.
  5. Gather all crumbs into a ball, divide into two halves.
  6. Flatten each half into a patty the side of your hand and wrap in plastic.
  7. Chill in the fridge overnight.
  8. The next day, preheat the oven to 350F.
  9. Dust the counter and rolling pin with rice flour, and roll out each half to approximately 1/8-inch thick.
  10. Cut out crackers in your desired size and shape.
  11. Transfer to a parchment-lined baking sheet.
  12. Bake for approximately 15 minutes, until they appear a toasty brown colour.

Graham Crumb Crust (from Veganomicon):

Ingredients:

– 1 3/4 cups Ground graham cracker crumbs

– 1/2 cup Unsweetened shredded coconut

– 2 tablespoons Sugar

– 3 tablespoons Margarine (again, the soft kind is OK)

– 3-5 tablespoons Soymilk

Directions:

  1. Preheat the oven to 350F.
  2. Pulse enough graham crackers in a food processor to make 1 3/4 cups.
  3. Add the sugar and coconut to the crumbs in a microwaveable bowl.
  4. Add the margarine on top of the dry ingredients.
  5. Microwave until the margarine is almost completely melted.
  6. Stir until all four ingredients are well combined.
  7. Add enough soymilk that the crumbs are moist and hold together when squeezed.
  8. Press the crumbs thickly into a 9″ pie plate.
  9. Bake until the crust is slightly firm when touched, but the coconut is not too dark.
  10. Cool on a rack while preparing the filling.

Chocolate ganache filling (Adapted from Josee di Stasio’s coconut ginger truffle recipe in Chatelaine):

Ingredients:

– 2/3 cup High-quality coconut milk (gold can, but room-temperature and SHAKEN before opening)

– 200g Dark chocolate chips

Directions:

  1. Heat the coconut milk in a heavy-bottomed saucepan, on medium heat.
  2. Once the milk is simmering, remove from the heat.
  3. Pour the hot milk over the chocolate chips in a heat-proof bowl.
  4. Stir with a spatula until the ganache is a shiny, dark brown.
  5. Pour into a prepared pie crust, or refrigerate for other uses (this is delicious for dipping fruit, or filling a cake).

White chocolate whipped topping (original by Agent Minty):

Ingredients:

– 1 teaspoon Soymilk powder

– 1/2 cup, divided, High-quality coconut milk (gold can, but room-temperature and SHAKEN before opening)

– 1 teaspoon Vanilla Extract

– 1.5 tablespoons Icing (powdered) sugar

– 50g Solid food-grade cocoa butter

Directions:

  1. Combine the soymilk powder with approximately 2 tablespoons of coconut milk in a saucepan, off the stove.
  2. Do NOT proceed until all powder is incorporated! A spatula works well for this – I have to press the clumps against the side of the pot to break them up.
  3. Add the vanilla and stir.
  4. Turn the heat under the saucepan to medium-low.
  5. Add the icing sugar and stir until well combined.
  6. Heat the paste for a few minutes until you have a smooth mixture that is slightly warm.
  7. Add half of the remaining coconut milk.
  8. Once the mixture starts to simmer, remove the mixture from the heat and add the cocoa butter.
  9. Allow the cocoa butter to melt and stir rapidly to disperse the fat into the mixture.
  10. Add the remainder of the coconut milk and stir to get a creamy emulsion.
  11. Pour into a mixing bowl and chill for at least an hour.
  12. Whip the mixture with the whisk attachment of a stand mixture until the topping is the texture of soft whipped cream.
  13. Pour gently into a piping bag fitted with a large decorative tip.
  14. Pipe rosettes onto the pie or whatever else you wish to garnish. Idea: pipe into parfait glasses, chill, and serve with fruit as a light dessert.