

I guess that it’s been a rather long hiatus. Excuses, excuses abound, but you’re not here to read those. You’re here to see the goods! And in today’s case, they are totally worth it: vegan easter eggs filled with marshmallow or peanut butter fillings, or solid fruit-and-nut eggs.

The first Easter after I went vegan was hard, because (as I think I mentioned before) I love seasonal candy. Take cheap jelly beans, make them egg shaped and speckled, and I’m sold. I loved Reese’s eggs and those malted-milk Robin Eggs, too. I’m still working on a malt ball substitute, but the eggs I present to you today are a huge hit with my family – I make several dozen to give away.


In order to make these, I had to use a mould, which I bought from Bulk Barn several years ago. As I wrap the completed chocolates in foil and store them in the refrigerator, I didn’t brother to temper the chocolate after melting it. I just used vegan semisweet chocolate chips and melted them in the microwave.
The recipes below fall more into the “unrecipe” category, as the amounts are suggestions; the number of eggs will depend on the size and shape of moulds you use. Mine were the same general shape as a chicken’s egg (but halved).

Finally, the marshmallow recipe that I used produces far more than the filling required for one dozen eggs (I moulded six chocolate shells, popped them out and moulded six more to fill all at the same time). I experimented with making a vein version of Peeps, those chick shaped, sugar coated marshmallows. They are in some of my photos above, but they look more like chick-elephant hybrids. The rest of the marshmallows I made into traditional cylindrical mallows. To get the pastel fine sugar, I just pureed coloured sanding sugar in a spice grinder until it was a coarse powder.

Ok, so here goes:
Chocolate Easter Eggs
A collection of original recipes by Agent Minty
Marshmallow Eggs (Vegan version of Russell Stover Eggs)
Makes 12 or more eggs, plus extra marshmallow filling
Ingredients:
- 1 3/4 cups dark chocolate chips
- Ingredients for Vegan Homemade Marshmallows
Instructions:
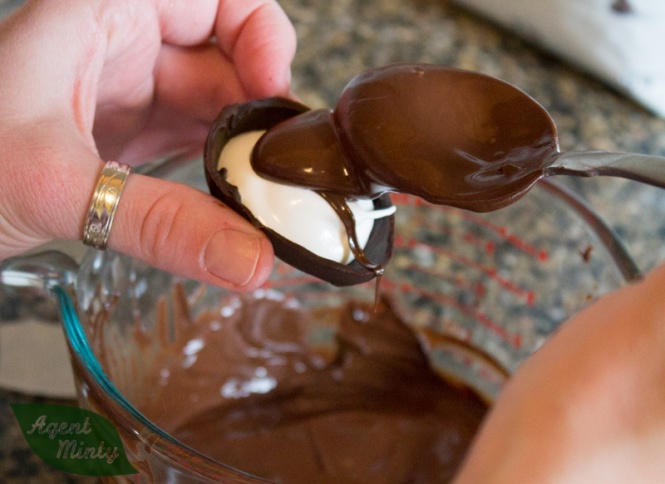
- Melt chocolate in microwave and use 1-2 tsp per cavity to line walls.Freeze for 5 minutes.

- Check to see if chocolate is thick enough. If you can see light through, add another thin later and chill for another 5 minutes or more.
- Prepare marshmallow filling according to recipe and transfer 2 cups to a large piping bag with no tip.
- Dollop about 2 Tbsp of rolling per moulded egg.

- Using a damp fingertip, smooth top of marshmallow down to better fill egg mould.
- Chill for at least 10 minutes.
- Re-melt chocolate and smooth chocolate over marshmallows, paying special attention to edges of the first half shell.
- Chill for at least 20 minutes before removing from mould and wrapping with foil.
- Optional: Pipe out remaining marshmallow mix onto sheets of parchment paper coated with fine sugar. Toss with more sugar. If cutting long tubes into short marshmallows, let cure for at least 30 minutes before cutting with scissors. Cure, uncovered, overnight for best texture.

Peanut Butter Eggs (Vegan version of Reese Eggs)
Makes 20 or more eggs. Scale as needed.
Ingredients:
- 2 1/2-3 cups dark chocolate chips
- 1 cup peanut butter
- 3/4 cups + 1 Tbsp icing sugar
- 3/8 tsp salt (if the peanut butter you use has salt, cut to 1/8 tsp)
- 2 Tbsp packed brown sugar
Instructions:
- Melt chocolate in microwave and use 1-2 tsp per cavity to line walls.Freeze for 5 minutes. Coat a second time if needed.
- Mix together remaining ingredients until a smooth paste forms.
- Press 2-3 tsp of filling into each cavity and top with more melted chocolate.
- Store excess peanut butter filling in fridge between uses.
- Chill for at least 20 minutes before removing from mould and wrapping with foil.
- Repeat steps 1 and 3 to make more eggs as desired.
Fruit and Nut Eggs (Vegan version of Cadbury Fruit&Nut Bar)
Makes 8 or more eggs. Scale as needed.
Ingredients:
- 1 1/2 cups dark chocolate chips
- 6 Tbsp blanched, slivered almonds
- 1/4 – 5Tbsp raisins
Instructions:
- Toast slivered almonds for about five minutes until light brown.
- Coarsely chop raisins and toasted almonds.

- Melt chocolate and stir in chopped raisins and almonds.
- Fill moulds. Tap on a counter to remove air bubbles.
- Chill at least 30 minutes before removing from mould and wrapping with foil.
- Re-warm chocolate mixture briefly if needed to fill more moulds.

Happy Easter!


