Wonton Soup

WonTons-5

I have always loved wonton soup. Having spent a large portion of the 90s on military bases, which were quite culturally homogeneous, most of the “exotic” restaurants we had a chance to try were Chinese buffets. I loved them (in my pre-veg days), and was sad when I became vegetarian and couldn’t find meat-free wonton soup in restaurants.

WonTons-3

My parents had some in-depth cookbooks for people who wanted to learn Chinese cuisine, and as a teenager I experimented with making wontons filled with mashed tofu (instead of the recommended ground pork) and green onions. They were good but tended to leak tofu, and I made them occasionally in high school and university until I discovered a local buddhist vegan restaurant that makes divine wonton soup. Padmanadi is an awesome restaurant for anyone visiting Edmonton, veg or no. However, they are a 30+ minute drive away, and I wanted a recipe I could whip up at home.

WonTons-4

Trial and error resulted in a recipe that uses gluten flour in the filling for wontons that stay together while being cooked, but aren’t too gummy or rubbery. White pepper and five-spice powder give the broth a great flavour, and I heartily recommend adding your favourite vegetables, thinly-sliced, before serving. If you can’t find egg-free wonton wrappers, try using thin dumpling wrappers instead. I’ve used both, and dumpling wrappers are the ones used in the photos above.

Wonton Soup

An original recipe by Agent Minty

Makes 36 wontons

Ingredients:

  • 1/3 block (about 220 g) of medium or “traditional” tofu (not drained)
  • 1/4 can of chopped water chestnuts
  • 1 1/2 Tbsp soya sauce
  • 1/4 tsp ginger paste
  • 1 tsp water
  • 1 coarsely chopped scallion
  • Pinch of ground white pepper
  • 1/4 tsp 5-spice powder
  • 1/2 cup gluten powder (vital wheat gluten, seitan powder, etc)
  • 1 package vegan wonton wrappers
  • 2 scallions, thinly sliced
  • your preferred chopped vegetables: I like baby bok chou, sliced carrots, whole baby corn, and even a bit of cauliflower.
  • ~ 1 Tbsp miso paste
  • 1/4 tsp each ground white pepper and 5-spice powder
  • 2 Tbsp soya sauce

Instructions:

  1. Puree tofu in a food processor for about 20 seconds until mostly smooth but still a bit gritty.
  2. Add water chestnuts, soya sauce, ginger paste, water, chopped scallion, white pepper, and five-spice powder, and pulse a few times until incorporated but not too smooth.
  3. Add in gluten flour and pulse repeatedly until the texture is like cookie dough.
  4. Transfer to a bowl and cover with a lid or plastic wrap, and store at room temperature for 15-20 minutes to let the gluten develop.
  5. Pinch off 1-2 tsp-sized lumps of filling and place in the centre of the wrapper. Wet the edges of the wrapper and press to seal.
  6. Continue filling wontons, laying them on a single layer on a plate or tray to dry slightly.
  7. Prepare chopped vegetables and set aside.
  8. Prepare your broth – the miso paste, pepper, soya sauce, etc. are just recommended amounts for one large or two small servings (about 6 cups of broth). Add garlic, sriracha, ginger, or other seasonings to your taste.
  9. Bring a large pot of water to boil. Toss in the wontons you wish to eat (about 7 or 8 per person), and cook about 5 minutes, until they float.
  10. Meanwhile, transfer chopped vegetable to simmering broth and cook for the last two minutes.
  11. Transfer cooked wontons to the broth and add chopped scallions on top. Serve.
  12. Unused wontons can be frozen, uncooked, and tossed directly into boiling water to thaw when needed.

Vegan Greek No-gurt and Granola

Closeup Vegan Yogurt

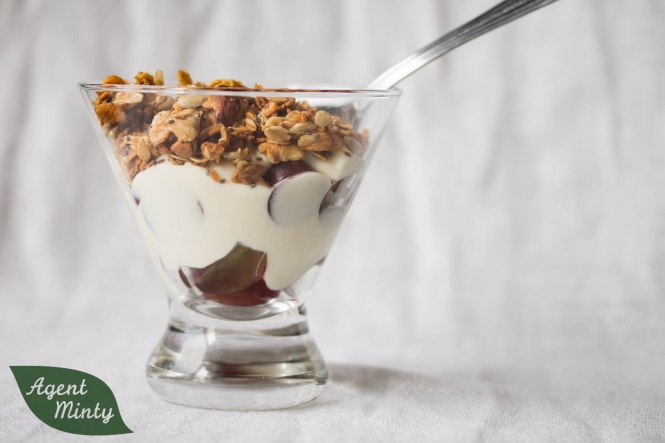
I am exceptionally proud of this recipe. This will be a game-changer to those of you who love the creaminess of yogurt but choose to go animal-free. This is better than the chalky stuff that was available six years ago. This is creamier than the lumpy cultured soy product that’s been around for years. This is on par with the current coconut and almond yogurts, but with less sugar, refined and plant-based starches, and way more protein.

Don’t believe me? See the bottom of this post for a detailed nutritional comparison…. I won’t put it here to bore the people just looking for vegan food porn.

I’m working on a cultured version right now, but this stuff tastes just as good anyway.

Imagine it layered with fruit and cereal for breakfast. Smeared onto tacos instead of sour cream. Swirled into soups for awesome creaminess. Dive in!

No-gurt and granola

I have also included a protein-packed granola recipe to go with it. It uses a hearty mix of seeds, grains, and nuts to keep you full.

A few notes about special ingredients:

The yogurt uses agar-agar, which I also used in my previous marshmallow recipe. This is an animal-free gelatine-like product, commonly used in asian desserts. It can be found at asian grocery stores, or at organic foods stores. You can buy flakes or powder. I prefer powder, as it is more precise to measure. My measurements are using powder, so if you can only get flakes, go by weight. It is assumed that you can use 3x the volume when subbing flakes for powder, but I have not personally tried this.

I use Soya Flakes, also called Rolled Soya, as a major ingredient in the granola. I’ve seen it online from Indian import stores, and from a british muesli store. If you’re Canadian and can get to a Bulk Barn, this is your best bet. If you can’t find soya flakes, no sweat. Use more old-fashioned oats, or try rolled Kamut flakes for a heartier crunch. I haven’t posted nutritional information for this recipe, as I suspect everyone’s choices will make macronutrient values vary.

Vegan Greek No-Gurt

An original recipe by Agent Minty

Ingredients:

  • 1/2 package traditional tofu (340g), not pressed
  • 1/4 cup coconut cream from a can – if you want less fat, use light canned coconut milk
  • 3 Tbsp +1/4 cup almond milk
  • 2 Tbsp lemon juice
  • 1 Tbsp maple syrup
  • 1.5 tsp (4g) agar-agar powder

Instructions:

  1. Puree tofu in a food processor or high-speed blender for at least one minute.
  2. Stir, scraping down sides of bowl, and process for at least another minute, until it is completely smooth to touch and taste.
  3. Add coconut milk, 3 Tbsp of almond milk, lemon juice, and maple syrup.
  4. Process for one more minute, scrape down bowl, and puree for another 10 seconds.
  5. Whisk agar powder into remaining 1/4 cup almond milk in a small saucepan.
  6. Heat on medium, stirring occasionally, until it comes to a gentle boil.
  7. Turn down heat and whisk continuously for another two minutes until the agar is completely dissolved.
  8. Take a spatula and scoop out approximately 1/4 of the tofu mixture into the agar mixture. Whisk well.
  9. Heat mixture for another 30 seconds, whisking continuously, then add another scoop of tofu mixture to the pot as before.
  10. Remove agar-tofu mixture from the heat. Start running food processor.
  11. Slowly transfer the warmed mixture into the running food processor.
  12. Process for another two minutes, until smooth and slightly cooled.
  13. Place the mixture into the refrigerator for 20-40 minutes (I just place the bowl of the food processor straight into the fridge).
  14. Once the mixture has solidified, return to the machine and process for 30-60 seconds until smooth.
  15. Store in a sealed container in the refrigerator for up to ten days.

High-Protein Granola – An original recipe by Agent Minty

Ingredients:

  • 1 2/3 cup old-fashioned rolled oats
  • 3 Tbsp raw pumpkin seeds
  • 2.5 Tbsp fine, unsweetened shredded coconut
  • 1 Tbsp chia seeds
  • 6.5 Tbsp sunflower seeds
  • 3/4 cup raw cashews, broken into smaller pieces
  • 1/4 roughly chopped raw almonds
  • 2/3 cup rolled soya flakes
  • 3 Tbsp melted coconut oil
  • 1/3 cup maple syrup (If not vegan, can substitute half volume for creamed honey)
  • 1/4 tsp nutmeg
  • 1/4 tsp cinnamon
  • 1/4 tsp salt

Instructions:

  1. Preheat oven to 300F.
  2. Combine oats, soya, coconut, seeds, and nuts in a large bowl.
  3. Combine coconut oil, maple syrup, spices, and salt in a microwave-safe bowl.
  4. Microwave oil mixture on medium power for 30-60 seconds, until it is runny.
  5. Stir liquid mixture briefly, then pour over dry oat mixture.
  6. Mix with a wooden spoon until all dry ingredients are lightly coated.
  7. Spread on a baking sheet lined with parchment paper.
  8. Cook for 10-15 minutes, until mixture is fragrant and nuts/seeds are lightly toasted.
  9. Cool for an hour before breaking granola into small clumps.
  10. Store in a sealed container at room temperature.

20140525-IMG_3292

 Nutritional Comparison

My No-gurt:

125 mL (1/4 of recipe) has:

  • 120 calories, 7g total fat, 1 g saturated fat, 6 g carbs, 4 g sugar, 7 g protein, 13% RDA Calcium, 10% RDA Iron

A popular brand of coconut yogurt (using full-fat coconut cream):

125 mL (calculated from 175 mL serving on label) has:

  • 100 calories, 3.6 g total fat, 3.2 g saturated fat, 16.4 g carbs, 5 g sugar, 1.4 g protein, 25% RDA Calcium, 4.2% RDA Iron

A popular brand of almond yogurt:

125 mL (calculated from 175 mL serving on label) has:

  • 71 calories, 4.3 g total fat, 0.4 g saturated fat, 9.3 g carbs, 5 g sugar, 2.1 g protein, 28.6% RDA Calcium, 2.8% RDA Iron

A popular brand of cultured soy product:

125 mL (calculated from 170 mL serving on label) has:

  • 107 calories, 2.1 g total fat, 0 g saturated fat, 17.9 g carbs, 10.7 g sugar, 3.57 g protein, 10.7% RDA Calcium, 1.1% RDA Iron

Yes, mine has more calories and more fat than the others, but it tastes awesome… and the protein is great if (like me) you’re trying to put on muscle in the gym!

Scrambled tofu that actually tastes good!

Scrambled tofu is one of those supposedly basic things that a lot of egg-haters eat. I had been trying for years to make it palatable, but the problem was that I often found them runny and bland. I even tried blending tofu with cornstarch and a zillion seasonings and cooking it to firm up into a (gross) omelette. Sometimes it’s better to just keep it simple. This isn’t so much of a recipe, as me sharing my “oh, duh! realization from a few months back that I finally remembered to photograph.

20140408-IMG_3112

It’s a protein-packed breakfast to have along with veggie sausage and fruit, or toast and jam. The veggies in the stir fry can vary, but I really recommend adding something. Vegetables add colour and flavour, make it even more filling, and the steam they release while cooking keeps the tofu soft on the inside. My favourite combinations are mushroom and spinach, red pepper and asparagus, and green onion and pepper.

20140408-IMG_3115

Ingredients:

  • 1/3 to 1/2 block of medium/traditional pressed tofu
  • olive oil
  • 1/2 to 1 cup of chopped veggies
  • Smoked Salt (Very important for flavour!)
  • Nutritional Yeast

Instructions:

  1. Press tofu while chopping vegetables.
  2. Heat about 1 tbsp of oil in a frying pan on medium-high.
  3. Add in chopped vegetables and sauté until their colours start to brighten, about 1 minute.
  4. Crumble in tofu, and sprinkle tofu immediately with smoked salt and a pinch of nutritional yeast.
  5. Stir everything together.
  6. If desired, add a little more oil.
  7. Cook, stirring, until tofu is golden.
  8. Eat immediately!

Tofu Salad

As promised, here’s something you can do with your pressed tofu: put it in a sandwich!

IMG_1236

Growing up, my favourite sandwich was egg salad, but I always felt uncomfortable eating eggs themselves (full ovo-lacto disclosure: I do eat egg-containing baked goods, etc., when I’m away from home). And I’m not a fan of the effort involved in cooking and peeling eggs, either.

Blogs everywhere (especially Meet the Shannons) have sung the praises of smoked salt for that slightly-sulfurous aroma that makes faux egg salad seem more legit. It’s true. Seasoned with a generous dollop of Dijon mustard and served with shredded lettuce, this stuff is 100% comfort food.

Recipe – Tofu Salad

Serves two on a diet or makes one very large sandwich. Also good scooped on top of a garden salad. Keeps up to 4 days in the fridge.

Ingredients:

  • Half of one 350-gram block of traditional tofu or medium tofu, sliced and pressed for at least 30 minutes.
  • 1.5 tsp Vegenaise or mayonnaise
  • 1 tsp Dijon mustard
  • 1/16 to 1/8 tsp (I use a generous grind from my salt grinder) of smoked sea salt
  • Freshly ground black pepper

1. Crumble the pressed tofu into a small bowl.

2. Add the other ingredients.

3. Mash together with a fork until this reaches your desired texture.

4. For best flavor, let tofu salad sit for at least half an hour.

How to Press Tofu

As I focus more on eating light, and on the cheap, I find that I’m eating more and more tofu. 700g of Traditional-style tofu is about $1.50, which works out to 25 cents per serving. In my next few posts, I will try to focus on ways to eat tofu. The shish kebabs in last week’s post were pressed Firm tofu, but I find that Traditional, or Medium tofu is the one I prefer for most applications. It can be blended into dips, mashed into tofu salad, scrambled, baked, and fried.

Package of tofu

My tofu of choice

The key to tasty tofu is pressing it for at least 30 minutes (an hour or more is best) beforehand. The expels extra water, giving it a chewier texture, less like the rubbery, squishy cubes that most people associate with tofu. Pressing also allows the tofu to better absorb seasonings and marinades.

If you don’t have an hour to spend pressing, even 10 minutes while you’re cutting up the other ingredients for your meal will improve the flavour and texture of your tofu.

To press:

1. Cut tofu into slices of your desired thickness. If I am going to stir-fry it as cubes, I slice it as thick as the cubes will be, but leave it as a rectangle for structural integrity while pressing. For tofu that will be crumbled, I slice it less than 1 cm thick, as this allows me to get the water out faster.

2. Lay slices on a clean, dry towel or cloth. Paper towel gets wet too fast. if you have enough cloth, two layers is even better.

Weighted and pressing.

Weighted and pressing.

3. Fold the cloth over top so that the tofu is completely enveloped.

4. If you’re concerned about mess, set wrapped slices on a tray or plate.

5. Place a cutting board or plate on top of the tofu, and place a can or other weight on top.

6. Let sit at least 30 minutes for thin slices or at least 60 minutes for thick slices.

Pressed tofu ready for making a sandwich!

Pressed tofu ready for making a sandwich!