Happy Easter! Chocolate Egg Inspiration!

ChocEggs-7

I guess that it’s been a rather long hiatus. Excuses, excuses abound, but you’re not here to read those. You’re here to see the goods! And in today’s case, they are totally worth it: vegan easter eggs filled with marshmallow or peanut butter fillings, or solid fruit-and-nut eggs.

ChocEggs-1

The first Easter after I went vegan was hard, because (as I think I mentioned before) I love seasonal candy. Take cheap jelly beans, make them egg shaped and speckled, and I’m sold. I loved Reese’s eggs and those malted-milk Robin Eggs, too. I’m still working on a malt ball substitute, but the eggs I present to you today are a huge hit with my family – I make several dozen to give away.

In order to make these, I had to use a mould, which I bought from Bulk Barn several years ago. As I wrap the completed chocolates in foil and store them in the refrigerator, I didn’t brother to temper the chocolate after melting it. I just used vegan semisweet chocolate chips and melted them in the microwave.
ChocEggs-12

The recipes below fall more into the “unrecipe” category, as the amounts are suggestions; the number of eggs will depend on the size and shape of moulds you use. Mine were the same general shape as a chicken’s egg (but halved).

ChocEggs-5

Finally, the marshmallow recipe that I used produces far more than the filling required for one dozen eggs (I moulded six chocolate shells, popped them out and moulded six more to fill all at the same time). I  experimented with making a vein version of Peeps, those chick shaped, sugar coated marshmallows. They are in some of my photos above, but they look more like chick-elephant hybrids. The rest of the marshmallows I made into traditional cylindrical mallows. To get the pastel fine sugar, I just pureed coloured sanding sugar in a spice grinder until it was a coarse powder.

ChocEggs-6

Ok, so here goes:

Chocolate Easter Eggs

A collection of original recipes by Agent Minty

Marshmallow Eggs (Vegan version of Russell Stover Eggs)

Makes 12 or more eggs, plus extra marshmallow filling

Ingredients:

Instructions:

  1. Melt chocolate in microwave and use 1-2 tsp per cavity to line walls.Freeze for 5 minutes.
    ChocEggs-9
  2. Check to see if chocolate is thick enough. If you can see light through, add another thin later and chill for another 5 minutes or more.
  3. Prepare marshmallow filling according to recipe and transfer 2 cups to a large piping bag with no tip.
  4. Dollop about 2 Tbsp of rolling per moulded egg.
    ChocEggs-10
  5. Using a damp fingertip, smooth top of marshmallow down to better fill egg mould.
  6. Chill for at least 10 minutes.
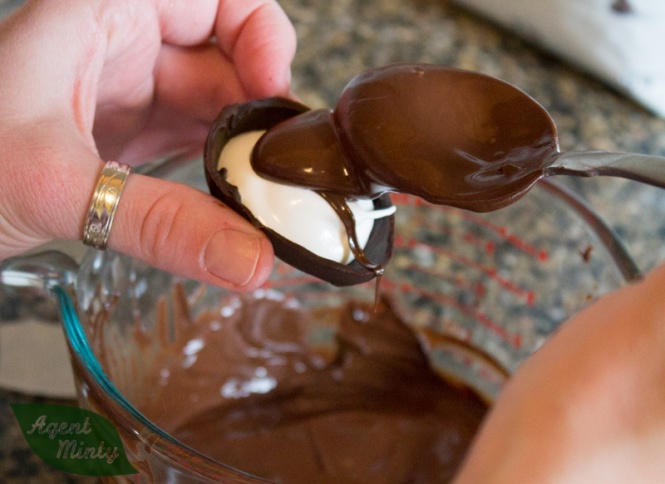
  7. Re-melt chocolate and smooth chocolate over marshmallows, paying special attention to edges of the first half shell.
  8. Chill for at least 20 minutes before removing from mould and wrapping with foil.
  9. Optional: Pipe out remaining marshmallow mix onto sheets of parchment paper coated with fine sugar. Toss with more sugar. If cutting long tubes into short marshmallows, let cure for at least 30 minutes before cutting with scissors. Cure, uncovered, overnight for best texture.

ChocEggs-11

Peanut Butter Eggs (Vegan version of Reese Eggs)

Makes 20 or more eggs. Scale as needed.

Ingredients:

  • 2 1/2-3 cups dark chocolate chips
  • 1 cup peanut butter
  • 3/4 cups + 1 Tbsp icing sugar
  • 3/8 tsp salt (if the peanut butter you use has salt, cut to 1/8 tsp)
  • 2 Tbsp packed brown sugar

Instructions:

  1. Melt chocolate in microwave and use 1-2 tsp per cavity to line walls.Freeze for 5 minutes. Coat a second time if needed.
  2. Mix together remaining ingredients until a smooth paste forms.
  3. Press 2-3 tsp of filling into each cavity and top with more melted chocolate.
  4. Store excess peanut butter filling in fridge between uses.
  5. Chill for at least 20 minutes before removing from mould and wrapping with foil.
  6. Repeat steps 1 and 3 to make more eggs as desired.


Fruit and Nut Eggs (Vegan version of Cadbury Fruit&Nut Bar)

Makes 8 or more eggs. Scale as needed.

Ingredients:

  • 1 1/2 cups dark chocolate chips
  • 6 Tbsp blanched, slivered almonds
  • 1/4 – 5Tbsp raisins

Instructions:

  1. Toast slivered almonds for about five minutes until light brown.
  2. Coarsely chop raisins and toasted almonds.
    ChocEggs-13
  3. Melt chocolate and stir in chopped raisins and almonds.
  4. Fill moulds. Tap on a counter to remove air bubbles.
  5. Chill at least 30 minutes before removing from mould and wrapping with foil.
  6. Re-warm chocolate mixture briefly if needed to fill more moulds.


ChocEggs-8

Happy Easter!

Visiting the in-laws and accommodating diverse dietary needs

We drove last week to visit sunny Cranbrook, BC and stay with my in-laws for the Easter long weekend. Unlike our hometown, which was covered in a foot of slushy snow when we left, the ground there was already thawed and I could see bight green lilac buds out of the kitchen window.

My mother-in-law is trying to avoid many foods to control some health issues. Any shared food should be vegan (Mrs. Minty’s needs), gluten-free, and without nightshades (tomato, pepper, eggplant), chocolate, or citrus (for MIL). Some things will have to be separated, as my in-laws need meat at least once a day while we still need protein, so for one dinner we had Shish Kebabs, allowing each person to pick only the foods that keep them happy and healthy.

IMG_1295

Veggie shish kebabs

I pressed some firm tofu and marinated it in a dijon mustard, herb, and wine vinegar mix. Everyone could choose from mushrooms, sweet potato cubes, pineapple, onion, or zucchini.

For dessert, we some homemade sweets.

My MIL has the sweet philosophy of “my kitchen is your kitchen,” so while she was at work and her husband and Mrs. Minty were running errands I made fudge. This is sometimes called Maple Fudge, but has no maple. It is made from (coconut) cream and brown sugar, plus a few other things. The hard part is waiting an hour and a half for the cooked sugar to cool before beating it. In the meantime, your whole house will smell heavenly!!

The fudge isn’t healthy, but I think it’s fine to eat anything in moderation. It isn’t exactly inexpensive, either… a batch will cost about $5 for supplies, including the walnuts. However, it’s WAY cheaper than stuff you buy at a candy store, and darn impressive!

Brown Sugar Fudge (“Caramel Cream Fudge” from the original Joy of Cooking):

Note: you WILL need a candy (not meat) thermometer, which is big and glass and can be found in most grocery stores. You SHOULD use a stand mixer for step #8, unless you want Popeye arms.

  • 1 cup brown sugar
  • 1 cup white sugar
  • 1/8 tsp salt
  • 1/3 corn syrup (the easiest way to measure is to put your pot on a scale and measure 80g of corn syrup into it)
  • 1 cup coconut cream
  • 2 Tbsp margarine
  • 1 tsp vanilla paste (vanilla extract is OK, too)
  • 1/4-1 cup chopped walnuts

1. Combine both sugars, syrup, salt, and milk in a large heavy saucepan.

2. Heat on med-hi, stirring, until it comes to a boil.

3. Cover and cook 2-3 minutes.

4. Remove lid, clip on a candy thermometer and turn heat to medium (or med-lo if you have cheap, thin pots).

5. Cook WITHOUT stirring until the thermometer reads AT LEAST 234 Farenhiet . Try to catch it at no more than 240F, as if it gets hotter the resulting fuge will be more brittle and grainy.

This cooking step can seem to take forever. Just wait. Don’t stir it or you might start sugar crystallization, resulting in poor quality fuge. This is the point where you will be happy you used a big pot so that the boiling sugar doesn’t splatter all over you and the stove.

6. Meanwhile, put the margarine in the bottom of the bowl for your stand mixer.

7. Once the fugdey syrup is the right temperature, pour it into your mixing bowl on top of the butter. STILL DON’T STIR!!! Allow it to cool until it is no more than lukewarm (at least 1 hour, maybe 2).

8. Add the vanilla and stir. I use the paddle attachment of the Kitchen-Aid and lock in the bowl, and mix on high speed. If you try to use one of those hand-held mixers, you will probably burn out its motor. I have successfully stirred fudge by hand with a wooden spoon. It was not fun.

9. Keep on stirring until you suspect that your fudge is a failure. Keep on stirring. Suddenly it will no longer be shiny, but instead be a nice opaque tan colour.

No longer shiny.

No longer shiny.

10. Joy of Cooking recommends stirring in 1 cup of walnuts at this point. One of my relatives dislikes walnuts, so I did not. Put your fuge into a pan that has been liberally greased and lined with parchment paper. It’s OK if the fudge doesn’t meet the edges of the pan.

11. I added walnuts on top of half of the fudge and pressed them in.

IMG_1292

Waiting for it to firm up!

12. Allow to set for an hour and cut into small squares. People say it can last a week tightly sealed, but no fudge has ever lasted that long in our home.